| | |
|  | | IMG-246024 |
|
| | Note!
Wait at least three minutes before unplugging the connectors or removing other electrical equipment. |
|
|  | | IMG-286186 |
|
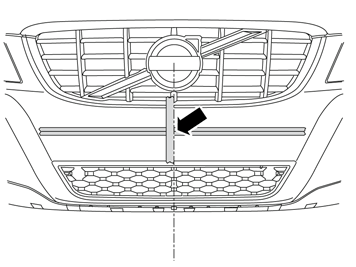
| | Applies to cars without Bumper Bar |
|  | | IMG-292923 |
|
| | |
|  | | IMG-292943 |
|
| | |
|  | | IMG-292944 |
|
| | |
|  | | IMG-292945 |
|
| | |
|  | | IMG-292963 |
|
|  | | IMG-286191 |
|
| | Note!
It is important that the holes are drilled horizontally to the car. |
B |
|  | | IMG-292983 |
|
| | |
|  | | IMG-293015 |
|
| | Note!
Do not drill through the impact member. |
|
|  | | IMG-286193 |
|
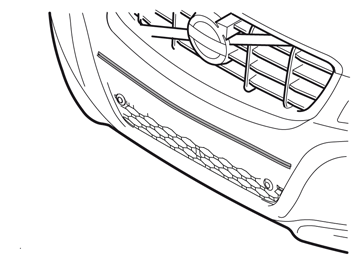
| | Applies to cars with Bumper Bar |
|  | | IMG-295003 |
|
| | |
|  | | IMG-296303 |
|
| | |
|  | | IMG-295004 |
|
| | |
|  | | IMG-293103 |
|
| | |
|  | | IMG-286199 |
|
|  | | IMG-286203 |
|
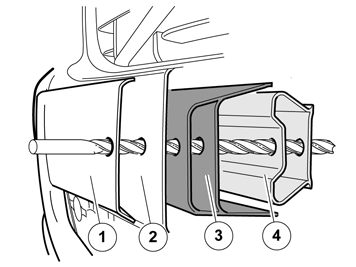
| | A Drill in the markings using a drill bit Ø 8.5 mm (21/64") and L=240 mm (9 7/16") through the Bumper Bar (1), bumper cover (2), the impact absorption area (3) and the impact member (4). Predrill through the bumper cover using a smaller drill.
Note!
It is important that the holes are drilled horizontally to the car. |
B |
|  | | IMG-292983 |
|
| | |
|  | | IMG-295863 |
|
| | |
|  | | IMG-286205 |
|
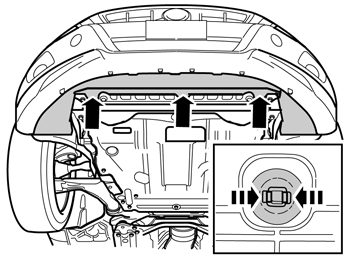
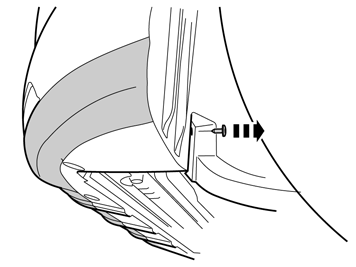
| | Applies to all cars without cooler to the turbocharger, |
|  | | IMG-286206 |
|
| | |
|  | | IMG-286207 |
|
| | |
|  | | IMG-286208 |
|
| | |
|  | | IMG-286209 |
|
| | |
|  | | IMG-286223 |
|
| | Applies to cars without cooler to the turbocharger, without Bumper Bar |
|  | | IMG-286224 |
|
| | Tightening torque: 24 Nm (17.7 Ibf.ft.). |
|  | | IMG-286225 |
|
| | Install the console. Install the screws. Install the number plate
|
|  | | IMG-296343 |
|
| | Applies to cars without cooler to the turbocharger, with Bumper Bar |
|  | | IMG-235795 |
|
| | |
|  | | IMG-286243 |
|
| | Install the spacers. Install the console. Install the screws. Install the number plate
|
|  | | IMG-286244 |
|
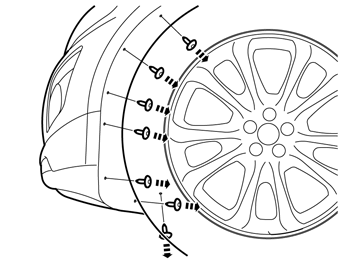
| | Applies to all cars with cooler to the turbocharger, |
|  | | IMG-286245 |
|
| | |
|  | | IMG-286246 |
|
| | |
|  | | IMG-286247 |
|
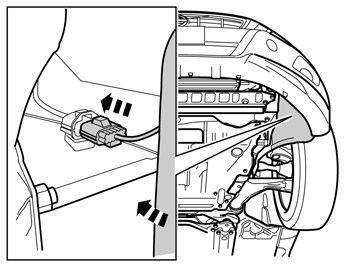
| | Fold back the wing liner. Loosen the connector and wiper hose to the headlight's high pressure washer. Place a container underneath to collect the washer water or seal the outlet on the washer pump.
|
|  | | IMG-286248 |
|
| | |
|  | | IMG-284652 |
|
| | Hint
The following procedure should be performed by two people. |
Unhook the end of the bumper cover at the rear edge from the hooks on both sides (small picture). Carefully pull off the ends, they are secured by two clips on the front wing and three below the headlight. Pull loose the bumper cover forward in one piece. If the car is equipped with fog lamps, loosen the connectors to these. Remove the bumper cover.
|
|  | | IMG-286290 |
|
| | Install the two spacer screws in the impact member together with the two nuts on the rear. Tighten to a torque of 24 Nm (17.7 Ibf.ft). Use a torque wrench, tighten from the front and counterhold the nuts at the rear.
|
|  | | IMG-286304 |
|
| | Hint
The following procedure should be performed by two people. |
If the car is equipped with fog lamps, connect the connectors to these. Reinstall the bumper cover and make sure that all catches engage.
|
|  | | IMG-286306 |
|
| | |
|  | | IMG-286307 |
|
| | |
|  | | IMG-286308 |
|
| | |
|  | | IMG-286445 |
|
| | |
|  | | IMG-286446 |
|
| | Applies to cars with cooler to the turbocharger, without Bumper Bar Install the console. Install the screws. Install the number plate
|
|  | | IMG-286447 |
|
| | Applies to cars with cooler to the turbocharger, with Bumper Bar Install the spacers. Install the console. Install the screws. Install the number plate
|
|  | | IMG-286448 |
|
| | |
|  | | IMG-286449 |
|
| | |
|  | | IMG-235802 |
|
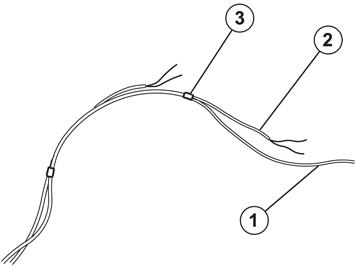
| | In order to facilitate cable routing, tape the red cable (1) together with the longer auxiliary lights' cables, black and blue (2). Finally, tape the ends of the shorter auxiliary lights' cables (3).
|
|  | | IMG-286563 |
|
| | |
|  | | IMG-235806 |
|
| | |
|  | | IMG-266189 |
|
| | |
|  | | IMG-235810 |
|
| | |
|  | | IMG-235811 |
|
| | |
|  | | IMG-299563 |
|
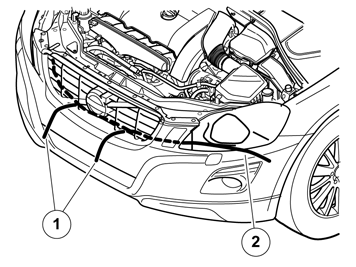
| | Pull the taped cables , black and blue, through the wider holes in the grille (1). The red cable is routed by the left-hand headlight (2). Route the cables using a wire or string.
|
|  | | IMG-235906 |
|
| | |
|  | | R3501571 |
|
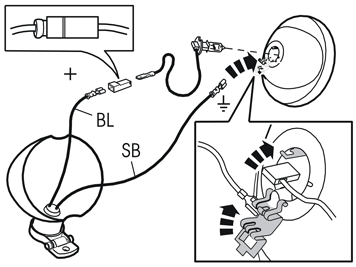
| | The illustration shows an outline of the connection of the auxiliary lights. See the separate instructions for the complete method. Thread the cables through the lamp housing. Install cable terminals onto both cables. Fit a socket housing to the blue (BL) cable to avoid short circuits. Connect the blue (BL) cable to the lamp's cable. Connect the black (SB) cable to ground on the light insert.
|
|  | | IMG-235916 |
|
| | |
|  | | IMG-235917 |
|
| | |
|  | | IMG-235918 |
|
| | |
|  | | IMG-299583 |
|
| | Note!
There are two catches on the long side. |
|
|  | | IMG-296344 |
|
| | |
|  | | IMG-235922 |
|
| | |
|  | | IMG-235923 |
|
| | |
|  | | IMG-235924 |
|
| | |
|  | | IMG-235925 |
|
| | Note!
Check that guides and rubber seals are fitted correctly, and that the cables do not become trapped. |
|
|  | | IMG-235927 |
|
| | |
|  | | IMG-239420 |
|
| | |
|  | | IMG-222267 |
|
| | |
|  | | IMG-317663 |
|
| | Note!
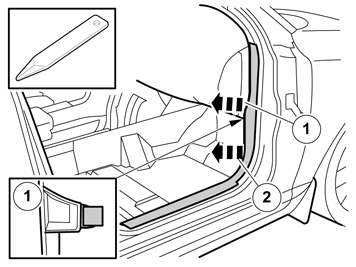
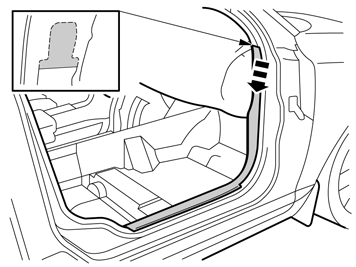
The front and upper sill panel must be removed and installed as one unit. |
|
|  | | IMG-317664 |
|
| | |
|  | | IMG-319003 |
|
| | |
|  | | IMG-222268 |
|
| | |
|  | | IMG-222270 |
|
| | |
|  | | IMG-295944 |
|
| | |
|  | | IMG-295945 |
|
| | |
|  | | IMG-295946 |
|
| | |
|  | | IMG-295947 |
|
| | |
|  | | IMG-239483 |
|
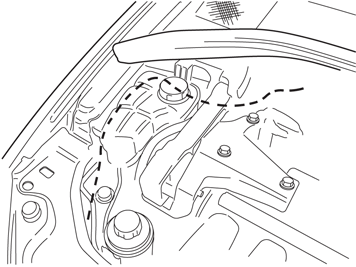
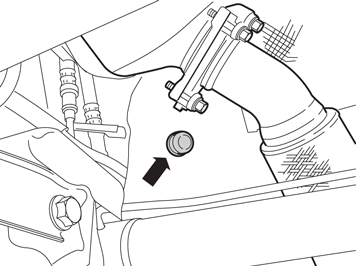
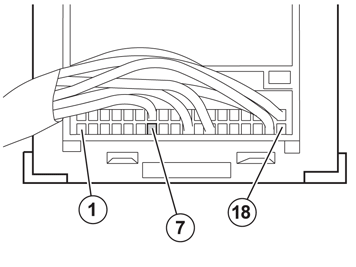
| | Move the carpeting aside. Make a cut in the thick insulating mat starting level with the blue connector of the central electronic module (CEM) and then continue straight down. Move aside the insulating mat to access the grommet.
|
|  | | IMG-235947 |
|
| | |
|  | | IMG-231309 |
|
| | |
|  | | IMG-236054 |
|
| | |
|  | | IMG-235950 |
|
| | Cut off a small rubber teat on the new rubber grommet and thread through the cable. Route the cable into the passenger compartment. Install the rubber grommet. Reinstall the engine splash guard and the cover panel.
|
|  | | IMG-235952 |
|
| | |
|  | | IMG-235953 |
|
| | |
|  | | IMG-235954 |
|
| | |
|  | | IMG-235955 |
|
| | Applies to vehicles manufactured with chassis numbers up to and including -84236 |
|  | | IMG-338140 |
|
| | Applies to vehicles manufactured with chassis numbers from and including 84237- |
|  | | IMG-296464 |
|
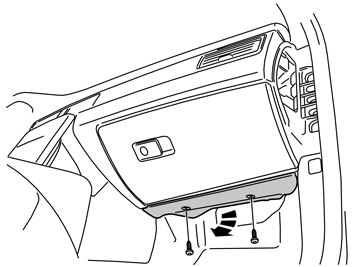
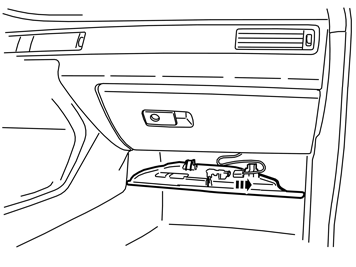
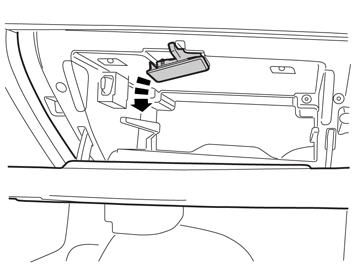
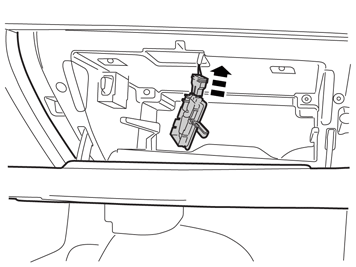
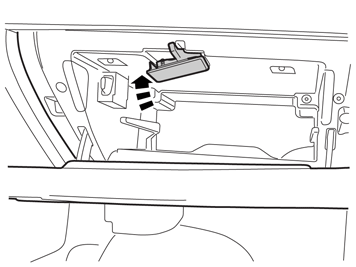
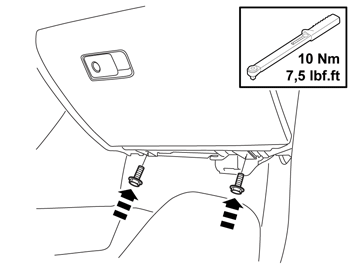
| | Applies to all models Take the glovebox and connect the connector to the Sim card holder, if necessary. Insert the connector to the glovebox lighting.
|
|  | | IMG-296465 |
|
| | |
|  | | IMG-296466 |
|
| | |
|  | | IMG-296467 |
|
| | |
|  | | IMG-286608 |
|
| | |
|  | | IMG-225272 |
|
| | |
|  | | IMG-267026 |
|
| | |
|  | | IMG-267027 |
|
| | |
|  | | IMG-267028 |
|
| | |
|  | | IMG-267029 |
|
| | |
|  | | IMG-286609 |
|
| | |
|  | | IMG-286610 |
|
| | |
|  | | IMG-282523 |
|
| | |
|  | | IMG-282524 |
|
| | |
|  | | IMG-282526 |
|
|  | | IMG-282525 |
|
| | |
|  | | IMG-282527 |
|
| | |
|  | | IMG-282528 |
|
| | |
|  | | IMG-282531 |
|
| | |
|  | | IMG-282530 |
|
| | |
|  | | IMG-282532 |
|
| | |
|  | | IMG-282533 |
|
| | |
|  | | IMG-282543 |
|
| | |
|  | | IMG-282544 |
|
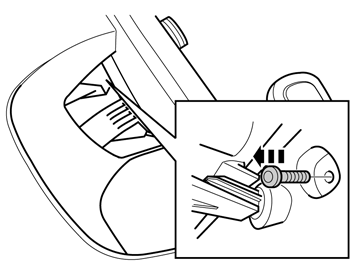
| | Applies to cars with an CCD keypad |
|  | | IMG-296139 |
|
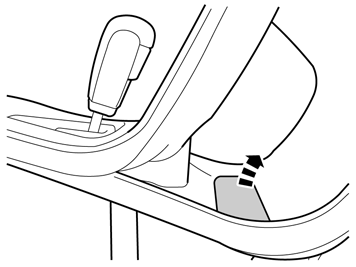
| | Applies to cars with automatic transmission |
|  | | IMG-296140 |
|
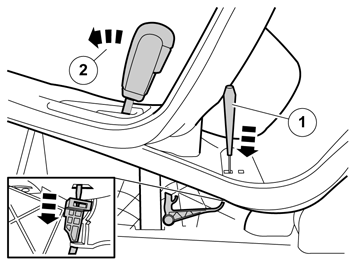
| | Applies to cars with automatic transmission |
|  | | IMG-282545 |
|
| | |
|  | | IMG-282546 |
|
|  | | IMG-282547 |
|
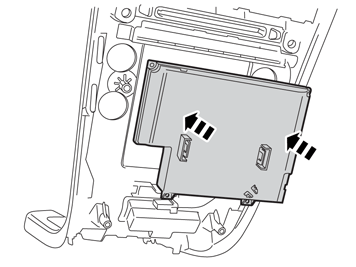
| | A Carefully pry off the centre console panel. Start at the rear edge on both sides, it is secured with two clips on the long sides and with four catches around the gearshift panel and two catches at the top. Lift up the panel a little and make sure that all cables are free from the gear lever carrier and components in the tunnel console and then lift it out.
B |
|  | | IMG-299584 |
|
| | |
|  | | IMG-299585 |
|
| | |
|  | | IMG-282550 |
|
| | |
|  | | IMG-296145 |
|
| | |
|  | | IMG-296146 |
|
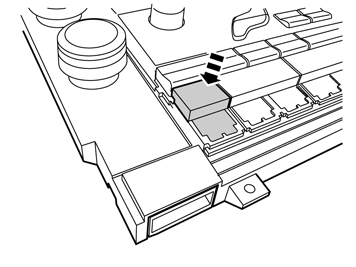
| | Note!
Cover plugs are purchased separately. |
|
|  | | IMG-282554 |
|
| | |
|  | | IMG-282555 |
|
| | |
|  | | IMG-282556 |
|
| | |
|  | | IMG-282557 |
|
|  | | IMG-282558 |
|
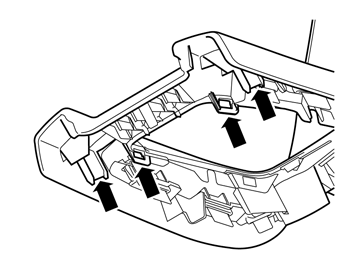
| | A Take the panel with CCM and insert the cables in the tunnel console. Place it on the top edge and secure with clips on the rear edge. Secure the panel in the centre console/tunnel console. Make sure that all clips engage.
B |
|  | | IMG-282559 |
|
| | |
|  | | IMG-282560 |
|
| | |
|  | | IMG-282561 |
|
| | |
|  | | IMG-282562 |
|
| | |
|  | | IMG-282563 |
|
| | |
|  | | IMG-282564 |
|
| | |
|  | | IMG-282566 |
|
| | |
|  | | IMG-301803 |
|
| | |
|  | | IMG-282567 |
|
| | |
|  | | IMG-282568 |
|
| | |
|  | | IMG-282569 |
|
| | |
|  | | IMG-242267 |
|
| | |
|  | | IMG-242268 |
|
| | |


