2008 L.H.D

Installation Instruction

Installation instructions, accessories
Volvo Car Corporation Gothenburg, Sweden
S80 2008
S80 (07-) 2008

Instruction NoVersionPart. No.Click to download PDF-version of this Installation Instruction
307216011.130721709
Bag holder, cargo compartment, parcel shelf


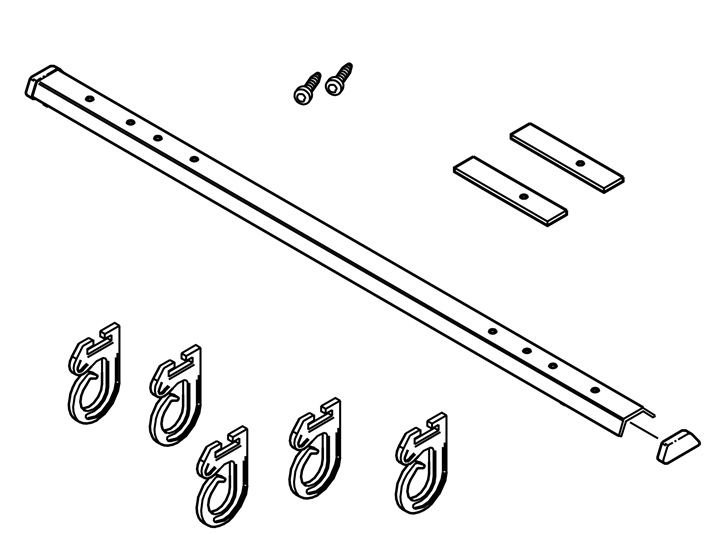
Equipment
A0000162

IMG-216281

IMG-213320


INTRODUCTION

  • Read through all of the instructions before starting installation.

  • Notifications and warning texts are for your safety and to minimise the risk of something breaking during installation.

  • Ensure that all tools stated in the instructions are available before starting installation.

  • Certain steps in the instructions are only presented in the form of images. Explanatory text is also given for more complicated steps.

  • In the event of any problems with the instructions or the accessory, contact your local Volvo dealer.


Applies to S40 (04-)

1A
IMG-216282
1B
IMG-216283
 

Applies to S40 (04-)

Illustration A

  • Take the rail, the hooks and the end stop from the kit

  • Thread the hooks onto the rail. Insert the end stop

  • Take the two mounting plates and the screws from the kit

  • Mount the plates in the outer holes of the rails. Use the screws. The long section of the mounting plate must point forwards

  • Lift the rail. Insert the mounting plates in the two large rectangular holes on the underside of the parcel shelf.

Illustration B

  • Turn the mounting plates 90°, so that the long section points inwards in the car and is over the edge of the holes in the parcel shelf

  • Slide the rail to the rear edge of the rectangular holes. Check that no wiring is trapped on the upper side of the parcel shelf. Tighten the rail to the parcel shelf.


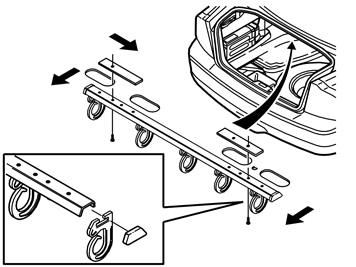
Applies to the S60

2
IMG-216284
 

Applies to the S60

  • Take the rail, the hooks and the end stop from the kit

  • Thread the hooks onto the rail. Insert the end stop

  • Take the two mounting plates and the screws from the kit

  • Mount the plates in the outer holes of the rails. Use the screws. The long section of the mounting plate must point outwards

  • Lift the rail. Insert the mounting plates in the two outer holes on the underside of the parcel shelf

  • Centre the mounting plates over the holes. Pull the rail backwards to the rear edge of the holes. Secure the rail using the two screws.


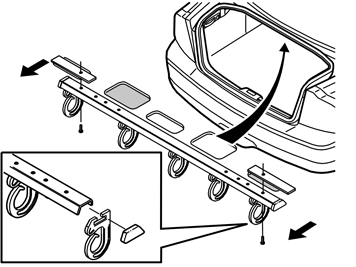
Applies to the S80 (-06)

3
IMG-216285
 

Applies to the S80 (-06)

  • Take the rail, the hooks and the end stop from the kit

  • Thread the hooks onto the rail. Insert the end stop

  • Take the two mounting plates and the screws from the kit

  • Mount the plates in the rail's penultimate holes. Use the screws. The long section of the mounting plate must point inwards.

  • Lift the rail. Slide the left-hand mounting plate into the left-hand hole on the underside of the parcel shelf. Then slide the right-hand mounting plate into the hole second from the right

  • Slide the rail as far to the right as possible so that the mounting plates are over the panel surfaces between the holes. Pull the rail backwards to the rear edge of the holes. Secure the rail using the two screws.


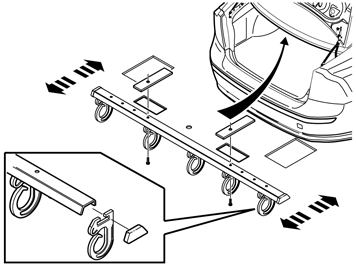
Applies to the S80 (07-)

4
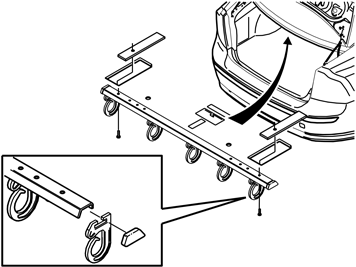
IMG-267503
 

Applies to the S80 (07-)

  • Take the rail, the hooks and the end stop from the kit

  • Thread the hooks onto the rail. Insert the end stop

  • Take the two mounting plates and the screws from the kit

  • Mount the plates in the rail's inner holes. Use the screws. The long section of the mounting plate must point forwards in the car.

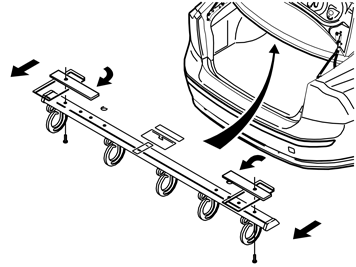
  • Lift up the rail and insert both mounting plates in the holes in the parcel shelf until the screws engage.

  • Now turn the plates so that they can be inserted into the holes.

  • Pull the rail backwards towards the rear edge of the holes, until the screws engage.

    The rear section of the plates may require lifting to go over insulation on top of the parcel shelf.

  • Tighten using the two screws.


Removal

5
A8901011
 

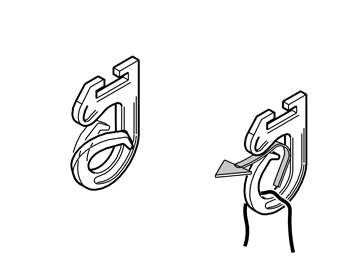
Removal

Carrier bags can be removed in two ways:

  • by carefully moving the hooks to one side

  • by lifting the handles for the carrier bags backwards, upwards and then forwards.