| | |
|  | | IMG-296185 |
|
| | Assembling the holder Note!
Take care when handling the components, they are fragile and are easily damaged. |
Take out the three bolts M5x25 part.no. 986957 and nuts from the kit. In order to avoid too much resistance when the nuts on the cradle are tightened, secure the bolt and run the nut on and off of the thread on the bolt. Do this with all the nuts and bolts.
|
|  | | IMG-282404 |
|
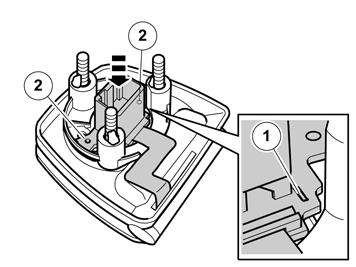
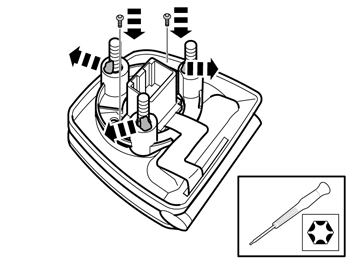
| | Take special tool 9814104 (torx driver, torx 6), and unscrew the two screws holding the connector in the holder. Carefully push the connector to one side with the cable to expose the bottom of the holder.
|
|  | | IMG-282405 |
|
| | |
|  | | IMG-282407 |
|
| | |
|  | | IMG-282408 |
|
| | |
|  | | IMG-282406 |
|
|  | | IMG-282409 |
|
| | Illustration A Illustration B |
|  | | IMG-282410 |
|
| | |
|  | | IMG-282411 |
|
| | Take the small torx screws and carefully tighten the connector to the holder. Ensure that the connector's circuit board is properly against the screw turret and that there is no play. Remove the butyl tape from the screws.
|
| | |
|  | | IMG-245980 |
|
| | |
|  | | D8502224 |
|
| | |
|  | | M8503890 |
|
| | |
|  | | D8703527 |
|
| | Angle the dashboard environment panel outwards so that it is possible to insert a couple of fingers between the tunnel console and the reverse of the panel. Detach the dashboard environment panel by pulling it downwards while maintaining the same angle. Some force is required because the panel is tightly installed. Disconnect the white connector to the 12 V outlet at the rear and move the climate panel to the side.
Note!
If any of the outer hooks break off, these must be repaired. The method for this can be found in VIDA in the section about the dashboard. |
|
|  | | IMG-240984 |
|
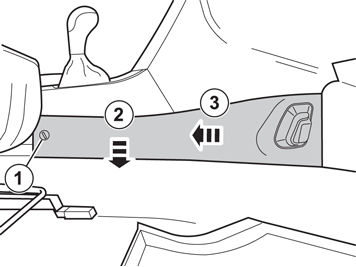
| | Turn the clip (1) a quarter turn anti-clockwise. Pull the panel out by the rear edge. Then pull the panel backwards until the hooks release. Remove the panel.
|
|  | | IMG-240985 |
|
| | |
|  | | M8503917 |
|
| | |
|  | | D8502454 |
|
| | |
| | |
|  | | IMG-277325 |
|
|  | | IMG-277326 |
|
| | |
|  | | IMG-277327 |
|
| | Caution!
Exercise care when positioning and taping the template onto the loudspeaker grille. Too much deviation will result in the holes coming in such a position that tightening from the underside of the dashboard is not possible. |
|
|  | | IMG-277328 |
|
| | |
|  | | IMG-277329 |
|
| | Mark the holes in the centre using a scriber. Pre-drill the holes according to the template using a Ø5 mm (13/64") bit. Use a 15 mm (19/32") drill stop. Drill square to the dashboard where the holes are located.
|
|  | | IMG-277330 |
|
|  | | IMG-279243 |
|
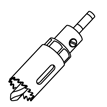
| | Illustration A Take a Ø14 mm (9/16") hole saw. Replace the centre drill in the hole saw with a Ø5 mm (13/64") drill. The hole in the centre drill's arbor is greater than the diameter of the drill, however wind some tape around the drill so that it sits firmly in the hole. Do not lock the centre drill with the locking screw. The drill is only used to guide the hole saw as the hole in the underside of the dashboard must not be greater than Ø5 mm (13/64") .
Illustration B |
|  | | IMG-277331 |
|
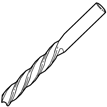
| | Use a Ø25 mm (1/2") hole saw. Change the centre drill in the hole saw back to the original centre drill. Drill for the connection to the connector. Drill through all the layers of the dashboard. Use a 25 mm (1") drill stop.
|
|  | | IMG-277332 |
|
| | |
|  | | IMG-277333 |
|
| | |
| | |
|  | | IMG-277334 |
|
|  | | IMG-277335 |
|
| | |
|  | | IMG-277336 |
|
| | |
|  | | IMG-277337 |
|
| | Used the long cable harness from the kit. Tape the small connector and a piece of the cable to the wire spiral. Pull the cable harness so that the connectors and fuse holder are positioned in the area for the climate panel.
Note!
Route the cable harness so that there is no risk of wear. |
|
|  | | IMG-277338 |
|
| | |
|  | | IMG-277339 |
|
| | |
|  | | IMG-277340 |
|
| | |
|  | | IMG-277341 |
|
| | |
| | |
|  | | IMG-277443 |
|
| | |
|  | | IMG-277445 |
|
| | |
|  | | IMG-277446 |
|
| | |
|  | | IMG-277447 |
|
| | |
|  | | IMG-277448 |
|
| | |
|  | | IMG-277449 |
|
| | Pull out any surplus cable from the centre console and secure the cable harness using butyl tape to the plastic reinforcement on the dashboard. Wind up the remaining surplus cable together with the connectors and secure with a cable tie to the glove compartment lighting cable harness.
|
| | |
|  | | IMG-277450 |
|
| | |
|  | | IMG-277451 |
|
| | |
|  | | IMG-277452 |
|
| | |
|  | | IMG-277453 |
|
| | |