2006 D5 AUTOMATIC L.H.D

Monteringsveiledning

Installation instructions, accessories
Volvo Car Corporation Gothenburg, Sweden
S80 2006
S80 (-06) 2006

Instruction NoVersionPart. No.Click to download PDF-version of this Installation Instruction
306353531.0
DVD, S80 Executive


Equipment
A0000162
A0000163

D3905245


INTRODUCTION

  • Read through all of the instructions before starting installation.

  • Notifications and warning texts are for your safety and to minimise the risk of something breaking during installation.

  • Ensure that all tools stated in the instructions are available before starting installation.

  • Certain steps in the instructions are only presented in the form of images. Explanatory text is also given for more complicated steps.

  • In the event of any problems with the instructions or the accessory, contact your local Volvo dealer.

 
1
A8800136
 

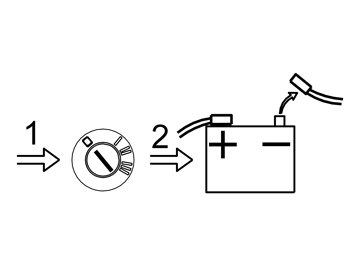
  • Turn the ignition switch to position 0.

  • Disconnect the battery negative lead.


    Note!

    Wait at least five minutes before disassembling the connectors or removing other electrical equipment.


2
D8505118
 

  • Remove the left-hand rear seat cushion (1) by pulling it up at the front, pulling it forward and then lifting it.

  • Detach the connector for the seat heating and put it to one side.

3
D8505119
 

  • Remove the seat belt from the guide (1) on the left-hand side cushion.

  • Put a hand down the side of the lower section of the left-hand side cushion. Release the catches while lifting the cushion. Place the cushion to one side.

4
D8502412
 

  • Detach the rubber moulding in the rear of the door frame.

  • Remove the two metal clips.

  • Pull the C-pillar panel in toward the car until the clips release.

  • Fold the panel inwards and remove it


    Note!

    When detaching the C-pillar panel, do not grip it with your hand or with a tool in the area around the IC hatch, as the joint function in the hatch would then become deformed and it cannot be reset.


5
D3501837
 

  • Detach the rear lighting in the rear of the roof panel and let it hang down.

6
D8505111
 

  • Turn the three clips in the rear of the roof panel 90° and remove them so that the roof panel can be lowered at the rear.

7
D3905225
 

  • Remove the old DVD player from the Velcro fastenings underneath.

  • Detach the connectors on the rear and put the DVD player to one side, it shall not be re-used.

8
D8505113
 

  • Fold up the armrest and the cover below in the centre console storage space between the seats in the rear seat.

  • Remove the four screws in the bottom and remove it.

9
D8505114
 

  • Remove the clamp for the detached cable harness in the rear of the retractable cover.

  • Remove the tie strap from the cable harness.

10
D3703645
 

  • Unplug the grey (GR) connector (1) with the cables running to the converter (2) from the connector attached in the storage space.

  • Clamp up the connector plus cables so that it does not rattle, it shall not be used any longer.

11
D3703644
 

  • Pull loose the rubber grommet with cable harness from the rear of the storage space.

12
D3703634
 

  • From the kit, take out the long cable harness with white (W) connector, black/red (SB/R) cables and fuse holder.

  • Insert the white (W) connector into the hole from the back of the storage space's rear end face. Grip the connector between your fingers and move your hand in to the back of the rear end face, move the connector up towards the hole and pull it out with your other hand using a pair of pliers. A coil can also be used by threading it through the hole. Tape the connector to it and pull it forward.

13
D3703646
 

  • Push the white connector through the rubber grommet. Do not refit the rubber grommet yet, the cable to the IR sensor is routed later and also runs through here.

14
D3703647
 

  • Now take the grey (GR) connector (1) on the recently routed black/red (SB/R) cable and connect it to the grey (GR) connector (2) attached in the storage space (see step 9). Hide the excess cable beneath the rear of the storage compartment.

15
D3905233
 

  • Take the infrared sensor from the kit and fit the cable in the sensor so that it points in the direction illustrated.

16
D3905224
 

  • Clean the recess on the underside of the sensor with isopropanol part no. 1161721 and wipe it dry.

17
D3501839
 

  • Clean the marked surface in the centre of the rear roof lighting with isopropanol part no. 1161721 and wipe it dry.

18
D8903911
 

  • Take both of the small white Velcro fastenings from the kit and remove the protective tape from them.

19
D3501838
 

  • Press the Velcro fastening firmly into the recess on the sensor.

  • Position the Velcro fastening centrally in the centre of the roof lighting at the outer edge of the glass and press it firmly.

20A
D3905234
20B
D3905235
 

Illustration A

  • Pull the cable to the IR sensor into the hole to the rear roof lighting. Pull it out to the left at the rear of the roof panel to the inflatable curtain gas generator. Pull the cable on the rear of the gas generator, down along the front end face of the antenna amplifier.

Illustration B

  • Pull the cable along the existing cable harness down to the seat cushion.

  • Clamp the cable by the existing cable harness using tie straps in the positions indicated.

21
D3703651
 

  • Continue to pull the cable along the existing cable harness by the seat cushion and into the centre console.

22
D3703648
 

  • Insert the connector on the black (SB) routed cable into the hole from the back of the storage's space rear end face. Grip the connector between your fingers and move your hand in to the back of the rear end face, move the connector up towards the hole and pull it out with your other hand using a pair of pliers. A coil can also be used by threading it through the hole. Tape the connector to it and pull it forward.

  • Make sure that you keep the routed connector away from the one already fitted, otherwise there is a risk of mixing them when connecting the DVD player

23
D3703649
 

  • Insert the connector through the rubber grommet.

  • Press the rubber grommet in the hole in the rear end face.

24
D8903904
 

  • Take the console from the kit and fit it as illustrated with the circular holes towards the storage space's unattached cover.

25
D8903905
 

  • Mark out in the outer holes for drilling holes for the screws.

26
D8505108
 

  • Take a Ø 4.5 mm (11/64") bit and drill out the two holes.

  • File down the edges of the holes.

27
D8903906
 

  • Take the two spring nuts and press in midway between the outer circular holes in the console.

28
D8505109
 

  • Take two screws from the kit and tighten the console to the cover.

29
D8903907
 

  • Take the two wide Velcro fastenings from the kit, centre them towards each other and press them together.

30
D8505110
 

  • Clean the surface of the console with isopropanol part no. 1161721 and wipe it dry.

31
D8903908
 

  • Remove one of the protective tapes on the Velcro fastenings.

32
D8903909
 

  • Press the Velcro fastening firmly onto the console.

33
D8505117
 

  • Refit the cover and tighten it in the bottom of the storage space with existing screws. Cable (1) with angled connector shall not be used any longer. Clamp it up by the existing cable harness using a tie strap.

34
D3905226
 

  • Fit the DVD player in the storage space and connect existing and routed connectors as follows:

  • White connector (1) to the power supply.

    Routed connector (2) to the IR sensor.

    Black existing connector (3) with two black rings around the terminal pin to A/V out, L/R

    Black existing connector (4) with one black ring around the terminal pin to A/V out, Video

35
D3905243
 

  • Move the DVD player back so that the rear end is centred immediately before the narrower part of the storage space.

36
D3905246
 

  • Remove the protective tape from the top Velcro fastening.

37
D3905242
 

  • Press in the front of the DVD player towards the console on the underside.

38
D8903910
 

  • Take the DVD player upper console from the kit and remove the protective tape.

39
D3905250
 

  • Centre the console in the centre of the top of the DVD player, fit it to the storage space's rear end face and then press it in to the DVD player until the tape adheres.

40
D3905248
 

  • Take four self-drilling screws from the kit and tighten the console to the rear end face in the storage space.

41
D3905247
 

  • Remove the two transport locking devices from the top of the DVD player.

42
D3905249
 

  • Take two patches from the kit and press them over the holes for the transport locking devices.

43
D3905238
 

  • Remove the protective tape from the IR sensor.

  • Press the IR sensor onto the interior lighting.

  • Press the interior lighting into the roof panel and make sure that the cable runs properly inside the roof panel.

44
 

  • Refit the clips and press in the roof panel at the rear.

  • Reinstall the C-post panel.

  • Reinstall the left-hand side cushion.

  • Connect the cable to the seat heating and refit the seat cushion.

  • Turn the ignition switch to position II and refit the battery negative lead.

  • Check the function of the DVD player.