| | |
|  | | A8800136 |
|
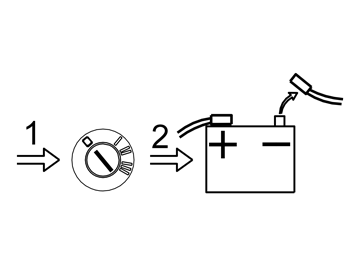
| | Preparations, dashboard Move the left front seat to its rearmost position Turn the ignition switch to position 0. Disconnect the battery negative lead.
Note!
Wait at least five minutes before disassembling the connectors or removing other electrical equipment. |
|
|  | | J3904779 |
|
|  | | J3904780 |
|
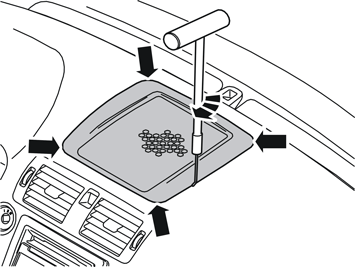
| | Illustration A Remove the loudspeaker grille as follows: Insert the tool, Volvo P/N 999-5919-46 in the joint between the loudspeaker grille and the dashboard approximately as illustrated, until it engages. Twist the tool 90° so that the bent section engages with the underneath of the loudspeaker grille.
Illustration B |
|  | | D8502030 |
|
| | |
|  | | D3902021 |
|
| | Applies to cars with centre loudspeakers Remove the three screws in the speaker (1). Lift up the loudspeaker. Disconnect the connector (2). Place the loudspeaker to one side, it shall not be used again.
|
|  | | D8502224 |
|
| | |
|  | | M8503890 |
|
| | Move the gear selector lever to its rearmost position. Pull the panel (1) with boot rearward and turn as illustrated. Remove the screws (2) from the dashboard environment panel.
|
|  | | D8703527 |
|
| | Angle the dashboard environment panel outwards so that it is possible to insert a couple of fingers between the centre console and the reverse of the panel. Detach the dashboard environment panel by pulling it downwards while maintaining the same angle. Some force is required because the panel is tightly installed. Disconnect the connectors on the reverse of the dashboard environment panel. Place the dashboard environment panel to one side.
Note!
If any of the outer hooks break off, these must be repaired. The method for this can be found in the Workshop Manual in the section about the dashboard. |
|
|  | | D8503946 |
|
| | Remove the screws from the radio bracket. Pull out the bracket with the radio. Pull the lower corner while pressing downwards. Detach the connectors from the radio and from the keypad to the telephone if fitted. Place the console with the radio to one side.
|
| | Installing the remote control holder |
|  | | D3905197 |
|
| | Installing the remote control holder Steps 9 - 13 only apply to cars without handsfree telephone. |
|  | | D8505104 |
|
| | |
|  | | D8505105 |
|
| | Press in the clips so that the ventilation grille is released. Remove the grille by prizing with a weatherstrip tool for example. Remove the connector (1) for the hazard warning flashers.
|
|  | | D3905198 |
|
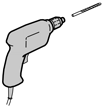
| | Mark out the holes for the bracket (1) by aligning the edge of the holder to the edge of the hole (2). Press the holder up 3 mm (7/64") and drill holes with a Ø5 mm (13/64") drill bit. Use a Ø20 mm (3/4") drill stop. Install the holder in the panel and guide the plate (3) through the hole for the ventilator. Screw in the holder and plate with the two screws from the kit. Reinstall the decor strip.
|
|  | | D3905199 |
|
| | |
| | Preparations, passenger compartment |
|  | | M8505102 |
|
| | Preparations, passenger compartment |
|  | | M8503250 |
|
| | |
|  | | D8503390 |
|
| | |
|  | | M8502823 |
|
| | |
|  | | D8502763 |
|
| | Take the seat belts out of the guide (1) on the right and left side cushion. Put your hand into the side of the lower section of the left and right-hand side cushions. Release the catches and lift the cushions at the same time. Place the cushions to one side. Fold both backrests forward.
|
|  | | M8503611 |
|
| | Carefully lift the front edge of the parcel shelf until the clips (1) release. Raise the parcel shelf more until the guide pins (2) disengage from their holes. Pull out the parcel shelf and lay it on the folded backrests.
|
| | Preparations, cargo compartment |
|  | | M8902133 |
|
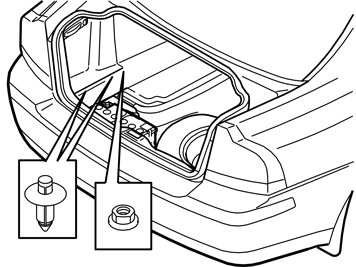
| | Preparations, cargo compartment Lift out the cargo compartment carpet. Press the centre of the clip at the bottom of the left folding side panel. Press the clip until a click is heard. Remove the two clips. Remove the plastic nut from the front edge of the side panel. Repeat the operation on the right-hand side.
|
|  | | D8502376 |
|
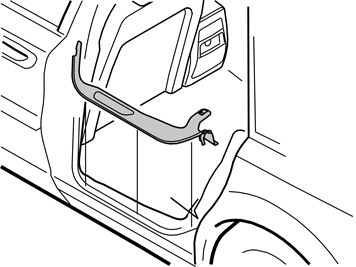
| | Turn the handle (1) on the right and left-hand sides. Turn the handle through 90°. Lower the side panels and lift them out. Put the left side panel to the side (there is a new one in the kit). Remove the two covers (2) and screws (3) in the sill trim panel. Hold the outer edges (4) of the sill trim panel and pull in toward the centre so that the clips release from the sides. Unplug the connectors (5) of the cargo compartment lamps. Remove the sill trim panel. Pull the sill trim panel straight upwards so that the clips release from the rear cross member.
|
|  | | M8503515 |
|
| | |
| | Installing the screen holder and centre loudspeaker |
|  | | M3703613 |
|
| | Installing the screen holder and centre loudspeaker |
|  | | M3703601 |
|
| | |
|  | | M3703602 |
|
| | |
|  | | M3703606 |
|
| | |
|  | | M3905170 |
|
| | |
|  | | M3905168 |
|
| | |
|  | | M3905169 |
|
| | Take the loudspeaker from the kit. Install the loudspeaker in the console together with the screen's holder with screws from the kit. The loudspeaker must be aligned with the cable connectors to the right in the car. Tighten all screws to the loudspeaker and holder.
|
|  | | M3905177 |
|
| | Align the screen with console and cable at the hole for the centre loudspeaker. Guide the free connector down through the hole to the centre loudspeaker, along the left-hand inside of the centre console, along the air ducts under the floor carpet and out at the sill to the left-hand front door. Take the remaining long cable harness from the kit and route it the same way as above, but start by guiding it up by the sill under the carpet at the left-hand front door, with the two grey connectors and relay first. Clamp both cable harnesses at the existing cable harness, at point (1) and at the strut (2) in the centre console. Use tie straps from the kit.
|
|  | | M3905175 |
|
| | Connect the routed cable harness with the two grey connectors and relay as follows: The grey connector (1) in the routed cable harness to the corresponding connector (2) in the cable to the centre loudspeaker. The grey connector (3) in the routed cable harness to the connector (4) in the cable on the centre loudspeaker. Install the complete unit in the hole in the dashboard with the existing screws.
Note!
Make sure that the relay and cables are not trapped. |
|
| | |
|  | | M3703590 |
|
| | Cable routing Route the two cables under the carpet, along the left-hand side of the car, to the rear door. Route the cable further under and along the front cable duct (1). Continue along the right-hand side of the rear cable duct (2). On the large cable harness is a black/white (SB/W) solid core wire connected to one of the large connectors. This shall subsequently be connected to the relay box on the left-hand side in the bulkhead. Securely clamp the cables at the cable duct with tie strap (3) from the kit.
|
|  | | M3703591 |
|
|  | | M3703660 |
|
| | Illustration A applies to cars up to and including model year -2004 Illustration B applies to cars from model year 2005- Route the two cables under the carpet, along the left-hand side of the car, to the rear door. Route the cable further under and along the front cable duct (1). Continue along the right-hand side of the rear cable duct (2). On the large cable harness is a black/white (SB/W) solid core wire connected to one of the large connectors. This shall subsequently be connected to the relay box on the left-hand side in the bulkhead. Securely clamp the cables at the cable duct with tie strap (3) from the kit.
|
| | Connection to the relay box |
|  | | M8903881 |
|
| | Connection to the relay box Remove the screw in the panel to the bonnet release and remove the bonnet release from the side of the body. Thread the bonnet release through the hole in the carpet and fold the carpet away from the side of the body.
|
|  | | M3703614 |
|
| | |
|  | | M3703612 |
|
| | Steps 36 – 39 apply to cars of model year 2005– |
|  | | M3703611 |
|
| | |
|  | | M3703610 |
|
| | Connection in connector Install the cable terminal P/N 9442486 from the kit on the routed black/white (SB/W) solid core wire. Connect the black/white (SB/W) solid core wire to position 59 in the connector. The positions are marked with small figures on end faces of the connector. Reinstall the connector in the holder and install the connector in the relay box. Fold back the carpet. Reinstall the bonnet release and tighten it with the screw.
|
|  | | IMG-218180 |
|
| | The connection in the connector at position 59 is in use by another cable Undo and cut the cable in position 59 a bit from the connector so that the new cable can be spliced together with this one using a crimping sleeve. Splice the leads as illustrated in steps 40 - 42. Reinstall the connector in the holder and reinstall the connector in the relay box. Fold back the carpet. Reinstall the bonnet release and tighten it with the screw.
|
|  | | A3700288 |
|
|  | | A3700174 |
|
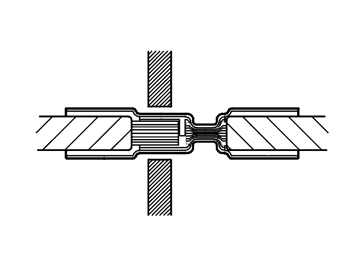
| | Splicing with insulated, water-resistant splicing sleeve Illustration A Select a suitable splicing sleeve based on the area of the cable. See table. Colour | Cable area mm² | Stripping length mm | Green/White | 0.3 - 0.5 | 5 | Red | 0.5 - 1.0 | 6 | Blue | 1.0 - 2.5 | 7 | Yellow | 4.0 - 6.0 | 7 |
If the area of the cables differs so greatly in size that they do not fit the same splicing sleeve, select the splicing sleeve that fits the thicker of the cables. Illustration B |
| | Pressing the sleeve Illustration A Insert the crimping sleeve, P/N 9130467, in the press tool, P/N 9512785. Select a socket based on the colour marking. Clamp the pliers just enough that the crimping sleeve remains in the pliers. Insert the cable in the crimping sleeve until it reaches the stop.
Note!
Make sure that the cable insulation does not come into the press area of the sleeve or that the stripped part or the cable extends outside of the sleeve. |
Illustrations B and C Press the legs of the pliers completely together to ensure a proper splice. The pliers will then release automatically. With your hand, check that the crimping sleeve is securely in place.
|
|  | | D3701792 |
|
|  | | A3700190 |
|
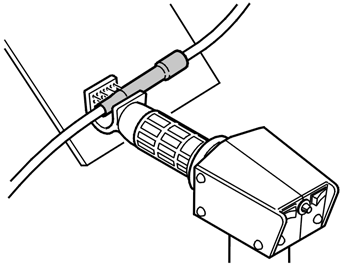
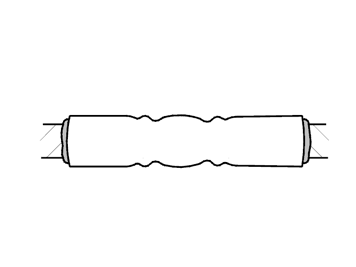
| | Heating the crimping sleeve Illustrations A and B Place a suitable shield behind the cables to be crimped to prevent thermal stress to the surrounding area. Warm the sleeve with a hot air gun, P/N 9512777, and suitable nozzle. It is extremely important that the crimping sleeve be securely crimped around the cable. You should be able to see that a little bit of glue has been forced out around the cable. (Illustration B).
|
|  | | D3702756 |
|
| | Steps 43 – 45 apply to cars up to and including model year –2004 Insert a screwdriver up between the bracket and relay box. Turn the screwdriver so that the bracket expands. At the same time pull the bracket out towards the lower edge of the dashboard. Remove the relay box from the bracket and pull it down under the dashboard.
|
|  | | D3702757 |
|
| | Undo the screw holding the connector so that it releases from the threads. Feel with your fingers to release the screw.
Caution!
Take care not to damage the terminal pins. |
Detach the connector using pliers. Grip the screw and pull it straight out so that the connector and cover follow too.
|
|  | | IMG-218181 |
|
| | Undo and cut the cable in position D10 a bit from the connector so that the new cable can be spliced together with this one using a crimping sleeve. Splice with an insulated, water-resistant splicing sleeve as in steps 40 - 42.
Reinstall: the connector the cover on the connector the connectors to the relay box and tighten the screw the relay box. Fold back the carpet. Reinstall the bonnet release and tighten it with the screw.
|
| | Installing the GPS antenna |
|  | | M3703594 |
|
| | Installing the GPS antenna |
|  | | M8903882 |
|
| | |
|  | | M8903883 |
|
| | |
|  | | D8903899 |
|
| | |
|  | | M8903884 |
|
| | |
|  | | D3703619 |
|
| | Take the GPS antenna (1) and press it in the rear edge on the parcel shelf in the position as illustrated. Route the cable to the GPS antenna along the existing cable for the loudspeaker, inside the holder (2) for the seatbelt. Clamp at the points (3) with tie straps from the kit. Route the cable through the hole at the front edge of the wheel housing, out to the cargo compartment.
Note!
Make sure that the cable does not chafe against sharp edges. |
|
| | Installing the CD drive in the console |
|  | | D8100982 |
|
| | Installing the CD drive in the console |
|  | | M3905178 |
|
| | |
|  | | D3905212 |
|
| | Applies to kits with the older version of the CD console Take the CD drive console from the kit a drill a Ø3.5 mm (9/64") hole on each side of the console as illustrated. Deburr the hole edges and apply anti-corrosion agent to them.
|
|  | | D3905211 |
|
| | |
|  | | A0000334 |
|
| | |
|  | | D3905210 |
|
| | |
|  | | M3905182 |
|
| | |
|  | | A0000334 |
|
| | |
|  | | M3905183 |
|
| | |
|  | | D3905209 |
|
| | Insert the CD drive into the console. Fit the two screws from the kit in the console and CD drive. Do not tighten them yet. Press in the rear end of the CD drive against the console so that the Velcro fasteners secure. Tighten the CD drive to the console with the two screws.
|
| | Connection to CD drive, applies to cars outside Europe |
|  | | D3703631 |
|
| | Connection to CD drive, applies to cars outside Europe Applies to cars without towbar from and including model year 2005- Connect: the cable (1) with yellow connector in the routed cable harness to the CD drive, furthest to the left in the connector the cable (2) with brown connector in the routed cable harness to the CD drive the cable (3) with black connector in the routed cable harness to the CD drive the cable (4) from the GPS antenna (a faint click is heard when it is connected) to the CD drive. White and green/blue connectors in the routed cable harness are only used if the car is to have a TMC receiver. Clamp them up with tie straps from the kit. the cable (5) with large black connector in the routed cable harness to the socket for towbar wiring in the fuse holder.
|
|  | | D3703630 |
|
| | Applies to cars with towbar from and including model year 2005- Connect: the cable (1) with yellow connector in the routed cable harness to the CD drive, furthest to the left in the connector the cable (2) with brown connector in the routed cable harness to the CD drive the cable (3) with black connector in the routed cable harness to the CD drive the cable (4) from the GPS antenna (a faint click is heard when it is connected) to the CD drive. White and green/blue connectors in the routed cable harness are only used if the car is to have a TMC receiver. Clamp them up with tie straps from the kit. the adapter wiring (5) from the kit with large black and grey connectors, to the socket for towbar wiring in the fuse holder. The existing connector to the towbar wiring in the fuse holder is detached. the cable (6) from the towbar wiring to the adapter wiring the cable (7) in the routed cable harness to the adapter wiring
The two grey connectors shall not be used. Clamp them up together with all excess cables using a tie strap from the kit, on the left-hand side in the rear edge of the wheel housing in a suitable way, so that there is no rattling. |
|  | | D3703629 |
|
|  | | M3703700 |
|
| | Applies to cars without towbar up to and including model year -2004 Illustration A Connect: the cable (1) with yellow connector in the routed cable harness to the CD drive, furthest to the left in the connector the cable (2) with brown connector in the routed cable harness to the CD drive the cable (3) with black connector in the routed cable harness to the CD drive the cable (4) from the GPS antenna (a faint click is heard when it is connected) to the CD drive. White and green/blue connectors in the routed cable harness are only used if the car is to have a TMC receiver. Clamp them up with tie straps from the kit. the cable (5) in the adapter wiring from the kit with large black and grey connectors, to the corresponding connector in the routed cable harness
Illustration B the cable (6) in the adapter wiring is routed to the rear crossmember, over the rear end of the left-hand side member, to the pre-routed connector for the towbar wiring the grey connector (7) to the towbar wiring, to the corresponding connector in the routed adapter wiring
The two black connectors shall not be used. Clamp them up together with all excess cables using a tie strap from the kit, on the left-hand side in the rear edge of the wheel housing in a suitable way, so that there is no rattling. |
|  | | D3703628 |
|
|  | | M3703701 |
|
| | Applies to cars with towbar up to and including model year -2004 Illustration A Connect: the cable (1) with yellow connector in the routed cable harness to the CD drive, furthest to the left in the connector the cable (2) with brown connector in the routed cable harness to the CD drive the cable (3) with black connector in the routed cable harness to the CD drive the cable (4) from the GPS antenna (a faint click is heard when it is connected) to the CD drive. White and green/blue connectors in the routed cable harness are only used if the car is to have a TMC receiver. Clamp them up with tie straps from the kit. the cable (5) in the adapter wiring from the kit with large black and grey connectors, to the corresponding connector in the routed cable harness
Illustration B the cable (6) in the adapter wiring is routed to the rear crossmember, over the rear end of the left-hand side member, to the connectors for the towbar wiring pull apart the connectors (7) to the towbar wiring and connect to them the two grey connectors in the adapter wiring
The two black connectors shall not be used. Clamp them up together with all excess cables using a tie strap from the kit, on the left-hand side in the rear edge of the wheel housing in a suitable way, so that there is no rattling. |
| | Installing the TMC receiver, only applies to cars in Europe |
|  | | M3905189 |
|
| | Installing the TMC receiver, only applies to cars in Europe |
|  | | J8903917 |
|
| | |
|  | | J8903918 |
|
|  | | J3905258 |
|
| | Illustration A Illustration B |
|  | | J3905259 |
|
| | |
|  | | J3905260 |
|
| | |
|  | | J3905262 |
|
| | |
|  | | D3905205 |
|
| | |
|  | | M3703617 |
|
| | |
|  | | M3903315 |
|
| | Take the solid core wire from the kit and lay it along the rear crossmember.
Note!
The cable end with the angled connector must be on the left-hand side. |
Route the connector to the TMC unit. The cable must be routed on the underside of the fuse holder along the existing cable harnesses. Route the other end of the cable in front of the right-hand tail lamp to the antenna amplifier. Detach the cable and remove the existing amplifier on the right-hand side of the right rear side member, under the right-hand rear lamp. Take the antenna amplifier (1) from the kit. Connect the cable (2) to the connector (3) for the antenna in the rear bumper by the right-hand tail lamp. Position the antenna amplifier on the edge of the panel in front of the right tail lamp as illustrated. Tighten the antenna amplifier.
|
|  | | M3903788 |
|
| | Applies to cars from and including model year 2005- Clamp the cable at the existing cable harness under the tailgate sill panel with four tie straps (2) from the kit.
Applies to cars up to and including -2004 The cable to the antenna amplifier is clamped up together with the adapter wiring to the towbar wiring installed in steps 78 and 79.
|
| | Connection to CD drive and TMC receiver, only applies to cars in Europe |
|  | | D3703627 |
|
| | Connection to CD drive and TMC receiver, only applies to cars in Europe Applies to cars without towbar from and including model year 2005- Connect: the cables (1) with yellow, green and blue connectors in the routed cable harness to the CD drive (yellow connector to the left in the connection) the cable (2) with brown connector in the routed cable harness to the CD drive the cable (3) with black connector in the routed cable harness to the CD drive the cable (4) from the GPS antenna (a faint click is heard when it is connected) to the CD drive the cable (5) from the antenna amplifier under the right-hand rear lamp to the TMC receiver the cable (6) with large black connector to the socket for towbar wiring in the fuse holder
Clamp all excess cable with a tie strap from the kit, on the left-hand side in the rear edge of the wheel housing in a suitable way, so that there is no rattling. |
|  | | D3703626 |
|
| | Applies to cars with towbar from and including model year 2005- Connect: the cables (1) with yellow, green and blue connectors in the routed cable harness to the CD drive (yellow connector to the left in the connection) the cable (2) with brown connector in the routed cable harness to the CD drive the cable (3) with black connector in the routed cable harness to the CD drive the cable (4) from the GPS antenna (a faint click is heard when it is connected) to the CD drive the cable (5) from the antenna amplifier under the right-hand rear lamp to the TMC receiver the adapter wiring (6) from the kit with large black and grey connectors, to the socket for towbar wiring in the fuse holder (existing connector to the towbar wiring in the fuse holder is detached) the cable (7) from the towbar wiring to the adapter wiring the cable (8) in the routed cable harness to the adapter wiring
The two grey connectors shall not be used. Clamp them up together with all excess cables using a tie strap from the kit, on the left-hand side in the rear edge of the wheel housing in a suitable way, so that there is no rattling. |
|  | | D3703625 |
|
|  | | M3703604 |
|
| | Applies to cars without towbar up to and including model year -2004 Illustration A Connect: the cable (1) with yellow, green and blue connectors in the routed cable harness to the CD drive (yellow connector to the left in the connection) the cable (2) with brown connector in the routed cable harness to the CD drive the cable (3) with black connector in the routed cable harness to the CD drive the cable (4) from the GPS antenna (a faint click is heard when it is connected) to the CD drive the cable (5) from the antenna amplifier under the right-hand rear lamp to the TMC receiver the cable (6) in the adapter wiring from the kit, with large black and grey connectors, to the corresponding connector in the routed cable harness the cable (7) in the adapter wiring is routed to the rear crossmember, over the rear end of the left-hand side member, to the pre-routed connector for towbar wiring
Illustration B The two black connectors shall not be used. Clamp them up together with all excess cables using a tie strap from the kit, on the left-hand side in the rear edge of the wheel housing in a suitable way, so that there is no rattling. |
|  | | D3703724 |
|
|  | | M3703605 |
|
| | Applies to cars with towbar up to and including model year -2004 Illustration A Connect: the cable (1) with yellow, green and blue connectors in the routed cable harness to the CD drive (yellow connector to the left in the connection) the cable (2) with brown connector in the routed cable harness to the CD drive the cable (3) with black connector in the routed cable harness to the CD drive the cable (4) from the GPS antenna (a faint click is heard when it is connected) to the CD drive the cable (5) from the antenna amplifier under the right-hand rear lamp to the TMC receiver the cable (6) in the adapter wiring from the kit with large black and grey connectors, to the corresponding connector in the routed cable harness the cable (7) in the adapter wiring is routed to the rear crossmember, over the rear end of the left-hand side member, to the connectors for the towbar wiring
Illustration B The two black connectors shall not be used. Clamp them up together with all excess cables using a tie strap from the kit, on the left-hand side in the rear edge of the wheel housing in a suitable way, so that there is no rattling. |
| | |
|  | | D3905215 |
|
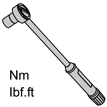
| | Installing the CD drive Install the console with the CD drive in the rear edge of the left-hand rear wheel housing with three screws (1) from the kit. Tighten the screws to 10 Nm (7 lbf ft). Clamp up the cables in the front edge of the console. Clamp all the way to the front edge of the cargo compartment at the existing cable harness/cable duct, using tie straps from the kit.
|
| | |
| | Finishing work Connect the connector to the radio, and if the car has a telephone, to its keypad. Reinstall the radio. Connect the connectors to the dashboard environment panel and reinstall it. Reinstall the panel and gear selector lever boot around the gear selector lever. Fold back the carpet. Reinstall the soundproofing panel on the left-hand side. Reinstall the centre console side panel. Reinstall the sill trim panels on the left-hand side. Check that the following fuses and relays are installed in the Rear Electronic Module (REM):
Applies to cars up to and including model year -2004 Position | Size | 5 | 5A | 9 | 15A | 15 | 20A | MA1 | Maxi relay |
Applies to cars from model year 2005- Position | Size | 7 | 15A | 20 | 20A |
Reinstall the front side panel in the cargo compartment. Connect the cargo compartment lighting's connectors to the tailgate sill trim panel and reinstall it. Install a new left-hand folding panel from the kit and reinstall the right-hand folding panel. Reinstall the side cushion. Fold the backrest back into place. Reinstall the seat cushion.
|
|  | | D3905206 |
|
| | |
|  | | D3905207 |
|
| | |
|  | | D3905216 |
|
| | |
| | Turn the ignition key to position II. Reconnect the battery negative lead. Reinstall the cargo compartment carpet.
|
|  | | M3905304 |
|
|  | | M3905305 |
|
| | Programming the system Illustration A Program the system as follows: Main menu Select "Settings" Select "Service" Press OK at "Code" Enter code: 6330 Select "X-Code" Enter code: XCA9 – VQ3Z A6SV – FWY1 Press "OK" Press "Save settings"
Illustration B |
| | Applies only if the car has AEM and the Radio Mute function is desired The function mutes the radio when there are navigation messages. Take a new cable with minimum area 0.35 mm² (0.000542501 in²). Using a crimping sleeve, splice the new cable with the brown/white (BN/W) cable from the brown connector at the navigation unit. Route the cable along the rear crossmember and connect it at position 11 in AEM. If the position is in use by handsfree mute, splice the cable with the crimping sleeve. Make sure that the splices are done as described in steps 40 - 42. Load the Telemute application in AEM.
|


