| | |
|  | | A8800136 |
|
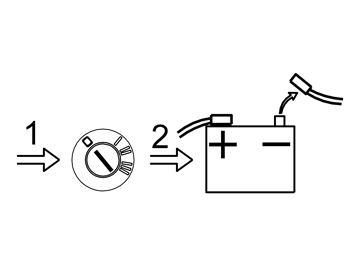
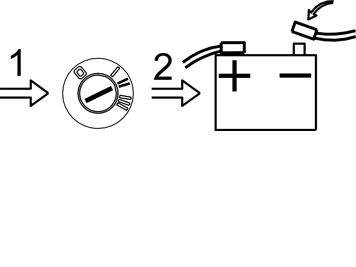
| | Preparations Slide back the front seats to the rearmost and uppermost positions Turn the ignition key to position 0 Remove the key from the ignition switch (does not apply to cars with automatic gearboxes) Disconnect the battery negative lead.
Note!
Wait at least five minutes before disconnecting the connectors or removing other electrical equipment. |
|
|  | | D8502506 |
|
| | Press in the clips so that the ventilation grille releases Remove the grille. Use a weatherstrip tool Remove the connector (1) for the hazard warning signal flasher.
|
|  | | D8502507 |
|
| | |
|  | | D8502304 |
|
| | |
|  | | D8502108 |
|
| | Move the gear selector lever to the rearmost position Pull the panel with the boot (1) backwards. Turn the panel as illustrated Remove the screws (2) from the climate control assembly.
|
|  | | D8703093 |
|
| | Angle the dashboard environment panel outwards so that it is possible to insert a couple of fingers between the centre console and the
side of the dashboard environment panel Detach the dashboard environment panel by pulling it downwards while maintaining the same angle. Some force is required because the panel
is tightly installed. Disconnect the connectors on the reverse of the dashboard environment panel. Place the dashboard environment panel to one side.
Note!
If any of the outer hooks break off, these must be repaired. The method for this can be found in the Workshop Manual in the
section about the dashboard. |
|
|  | | D8502109 |
|
| | Remove the screws (1) from the radio bracket Pull the bracket with the radio outwards at the lower edge. Pull the whole unit downwards Disconnect the connectors from the radio. Place the radio to one side.
|
|  | | M8503054 |
|
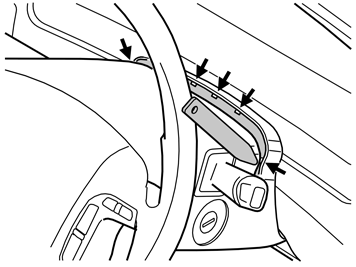
| | Lock the steering wheel in the lowest, rearmost position Remove the rubber seal from the upper steering column cover by carefully prying the 5 catches loose using a weatherstrip tool.
|
| | Installing and cable routing the handset holder |
|  | | D8504551 |
|
| | Installing and cable routing the handset holder Mark out the cable cut-out in the panel as illustrated, 6 mm (15/64") Remove the cover (1). Remove the screws (2) Angle the upper edge of the panel outwards. Remove the panel File the cut out according to the markings.
|
|  | | M3800760 |
|
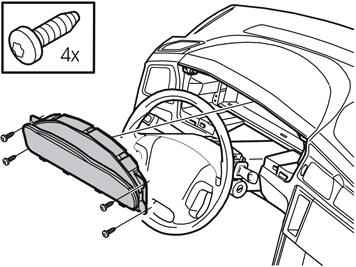
| | Remove the four screws for the combined instrument panel Pull out the combined instrument panel. Disconnect the connector on the reverse of the combined instrument panel Place the combined instrument panel to one side.
|
|  | | D3904330 |
|
| | |
|  | | D3904460 |
|
| | Mark out the holes for the carphone holder (1). First align the edge of the holder with the edge of the hole (2). Press the holder
upwards by 3 mm (7/64"). Drill a hole using a 5 mm (13/64") diameter drill bit. Use a 20 mm (3/4") diameter
drill stop Install the holder in the panel. Move the plate (3) through the hole for the vent. Screw the holder and the plate into place. Use the two
screws from the kit.
|
|  | | D8504834 |
|
| | |
|  | | D8504832 |
|
|  | | D8502253 |
|
| | Note!
There are two variants of A-post panel mounting nearest the headlining. See illustrations A or B. |
Illustration A Detach the door sill moulding (1) at the panel Pull the panel straight inwards into the car Lift up the panel Cut off the safety clip (2).
Note!
Ensure that the guide lugs on the panel do not scratch the dashboard. |
Illustration B Detach the door sill moulding at the panel Remove the two steel clips Pull the panel straight inwards into the car Lift up the panel.
|
|  | | D8504833 |
|
| | |
|  | | D3904872 |
|
| | |
|  | | D3904873 |
|
| | |
|  | | D3904874 |
|
| | |
|  | | D3904875 |
|
| | Install a new safety clip (point 14A). Alternatively ensure that the clips (point 14B) are correctly located. Check that the panel is
correctly positioned so that the IC system is not affected.
Note!
It is important to use a new safety clip when installing in accordance
with 14A. |
Press the A-post panel into place Route the microphone cable in through the left-hand end of the dashboard, into the space for the combined instrument panel and into the
centre console Secure the cable where it runs under the combined instrument panel using pieces of butyl tape Connect the combined instrument panel. Reinstall the combined instrument panel Reinstall the surround for the combined instrument panel. Tighten Reinstall the left-hand end panel on the dashboard Reinstall the door sill moulding in the door opening.
|
|  | | M8504490 |
|
| | |
|  | | D3904884 |
|
|  | | D3904331 |
|
| | Illustration A Illustration B Reinstall the combined instrument panel. Ensure that the cable for the handset holder is positioned on the right-hand side underneath the
combined instrument panel. Ensure that the wiring is not trapped Reinstall the panel for the combined instrument panel. Align the cable for the handset cradle in the filed out notch Pull any wiring excess into the centre console Reinstall the rubber seal in the upper steering column cover Reinstall the trim strip on the dashboard.
|
|  | | M3904316 |
|
| | |
|  | | M8503613 |
|
| | Remove both covers (1) from the front mountings on the front driver's seat. Remove the screws (2) from the front mountings. New screws
can be found in the kit Tip the seat backward slightly to route the wiring under the carpet.
|
|  | | M8504727 |
|
| | Applies to cars with an amplifier Remove the covers (1) from the front mounting screws for the right-hand seat Remove the screws (2) from the seat base Tip the seat back.
|
|  | | D8504728 |
|
| | Applies to cars with an amplifier Remove the panel (1) on the right-hand side of the centre console. Turn the clip at the rear edge of the panel through 90°. Pull the
rear edge of the panel outward and backward Detach the carpet (2) by the front left mounting for the right-hand seat. Pull the carpet forward and to the right Fold the rear mat (3) backwards at an angle.
|
|  | | D3703264 |
|
| | Applies to cars with an amplifier Disconnect the grey connector (1) from the amplifier.
|
|  | | D3904756 |
|
|  | | D3703263 |
|
| | Applies to cars with an amplifierIllustration A Take the black joint cable (from the kit) to the handset holder (1). Connect it to the cable from the handset holder that was routed down
earlier Take the large cable harness from the kit. Position the green connectors (2) in the space where the radio will be located Route the cable with the grey connectors (3) on the right-hand side inside of the centre console at the air ducts, alongside the cable
harness for the amplifier and down to the amplifier (Illustration B).
Illustration B |
|  | | D3703265 |
|
| | Applies to cars with an amplifier Connect the grey male terminal (1) in the pre-routed cable harness to the amplifier Connect the grey connector (2) that was disconnected from the amplifier to the remaining terminal (3) in the pre-routed cable harness.
|
|  | | M3904317 |
|
| | Applies to cars without an amplifier Take the black joint cable (from the kit) to the handset holder (1). Connect it to the cable from the handset holder that was routed down
earlier Take the large cable harness from the kit. Position the grey and green connectors (2) in the space where the radio will be located.
|
|  | | M3703118 |
|
| | Route the following three cable harnesses down: the cable harness with the white connector and a long single cable attached (1) the thin black cable to the microphone (2) the thick black cable from the handset holder in the space where the radio will be located (3). Route these cable harnesses inside the carpet, between the stay for the centre console (4) and the front air duct (5). Continue
backwards, then in front of the front mounting for the driver's seat and out through the carpet joint under the seat.
|
|  | | M3904314 |
|
| | Take the bracket, screws and hands free box from the kit Tighten the hands free box to the bracket as illustrated.
|
|  | | M3904315 |
|
| | Connect the routed cable harnesses to the hands free box: the cable harness to the radio (1) the cable to the microphone (2) the cable to the handset holder (3).
Applies to cars with accessory electronic modules (AEM) Route the long cable, secured at the cable harness to the radio, under the carpet on the driver's side and out to the door sill. This
will be connected to the accessory electronic module (AEM) later.
Applies to cars without an accessory electronic module (AEM) Insulate and hide the long cable that is secured at the cable harness to the radio. It will not be used.
|
| | Cable routing and connection to the accessory electronic module (AEM) |
|  | | D8503390 |
|
| | Cable routing and connection to the accessory electronic module (AEM) |
|  | | M8503730 |
|
| | |
|  | | D8502740 |
|
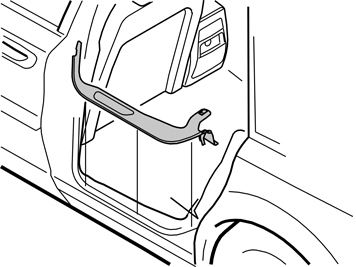
| | Insert your hand down the side of the lower section of the side cushion. Remove the left-hand side cushion Release the catches. At the same time lift the side cushion Place the cushion to one side Repeat the operation on the other side.
|
|  | | M8502823 |
|
| | |
|  | | D8502339 |
|
| | Remove the cargo compartment carpet (1) Turn the clips (2) on the left and right-hand side panels Remove the two clips and the plastic nut at the lower edge of the panels Remove the panels Remove the two covers (3). Slacken off the two screws (4). Grasp the outer edges of the panel (5). Pull the panel inwards towards the
centre so that the clips release from the sides. Disconnect the connectors (6) for the cargo compartment lamps Remove the panel by pulling it straight upwards so that the clips release from the rear crossmember.
|
|  | | D8503734 |
|
| | |
|  | | M3702551 |
|
| | Route the long cable (previously routed with the cable harness from the radio) under the carpet. Continue out to the left-hand side of
the car Clamp the cable at the existing cable at the left-hand side of the cross member. Use a tie strap (1) from the kit Route the cable inside the carpet and under the cable ducts (2) and (3) along the left-hand side of the car towards the cargo
compartment. Ensure that the cable is securely pressed down between the sills and carpets Route the cable under the existing wiring and the connectors by the cable duct (3).
|
|  | | M3702555 |
|
| | Route the cable along the left-hand rear wheel arch to the rear cross member Continue to route the cable along the rear crossmember over the rear edge on the right-hand rear wheel well Secure the cable along the existing cable harnesses. Use the tie straps (1) (from the kit).
|
|  | | M3702544 |
|
| | Slacken off the screw (1) and the nut (1) a few turns in the lock facing for the rear accessory electronic module (AEM) for the right
rear wheel well Pull the lock facing out to the right. Remove the lock facing.
|
|  | | M3702528 |
|
| | |
|  | | M3702529 |
|
| | Disconnect the large connector from the accessory electronic module (AEM). First press in catch A. Pull back locking handle B in the
direction of the arrow until a click is heard. Disconnect the connector Remove the connector from the accessory electronic module (AEM).
|
|  | | M3702530 |
|
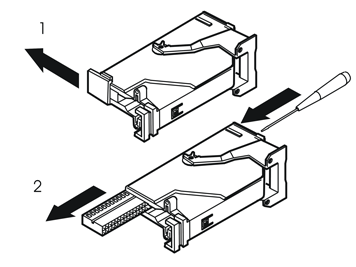
| | Remove the black catch holding the black switch in place in the connector by pulling in the direction of the arrow Remove the black switch by inserting a pointed object in the hole on the other end. Press the switch out.
|
|  | | M3702531 |
|
| | |
|  | | M3702543 |
|
| | Reinstall the black switch in the connector. Lock into place using the catch Press the connector into the accessory electronic module (AEM). Secure using the black arm Reinstall the accessory electronic module (AEM). Secure any excess wiring Reinstall the lock facing above the accessory electronic module (AEM). Tighten the screw and the nut. Tighten to 10 Nm
(8 lbf. ft.).
|
| | Installing the hands free box |
|  | | M8503612 |
|
| | Installing the hands free box Hint
Install the aerial according to the separate Installation Instructions. |
Tip the driver's seat back slightly Position the hands free box and the bracket with the mounting over the screw hole in the right front mounting for the driver's seat
Fold the seat down towards the mountings. Check that the hands free box bracket is positioned under the seat rail Route all excess cable in under the carpet.
Note!
Ensure that the none of the wiring is trapped. |
Tighten the front edge of the seat using the two new screws. Tighten to 40 Nm (30 lbf. ft.) Reinstall the covers for the screws.
|
| | |
|  | | M3904329 |
|
| | |
|  | | M3904759 |
|
| | Applies to cars with an amplifier Connect the switch from the handset holder extension cable (1) to the car aerial. The aerial is installed according to a separate
Installation Instruction Connect the connector (2) for the new large cable harness to the connector (3) that was disconnected from the radio Connect the connector (4) to the radio Connect any other connectors removed from the radio Reinstall the radio.
|
|  | | M3904320 |
|
| | Applies to cars without an amplifier Connect the switch from the handset holder extension cable (1) to the car aerial. The aerial is installed according to a separate
Installation Instruction Connect the new, large cable harness connectors (2) to the corresponding connectors removed from the radio (3) Connect the connectors (4) to the radio Connect any other connectors removed from the radio. Reinstall the radio.
|
| | Reinstall: the side panels at the centre console the ventilation grille the dashboard environmental panel the panel around the gear selector lever the panels for the door sills.
|
|  | | A8800137 |
|
| | |
| | |
| | |


