| | |
|  | | IMG-259683 |
|
| | |
|  | | IMG-259684 |
|
| | |
|  | | IMG-259685 |
|
|  | | IMG-273303 |
|
| | Illustration A Illustration B |
|  | | IMG-273304 |
|
| | Carefully pull of the ends of the bumper cover from the body on both sides. They are attached with hooks at the upper edge of the ends and at the lower edge of the tail lights. Pull off the bumper cover from the rear of the body, it is positioned in seven guides at the top edge of the long side. If the car has rear parking assistance, disconnect the connector on the right-hand side of it.
Note!
To prevent damaging the bumper cover, it is recommended to request the assistance of a colleague during this procedure. |
|
|  | | IMG-318704 |
|
| | Applies to cars with parking assistance Carefully pry up the catches on the cradles for the sensors and carefully pull the sensors off. Detach the clamps on the cable harness from the terminals in the bumper cover's lower section and place the cable harness with sensors to one side. It will be reused. Remove the sensors from the cable harness, these will not be reused. New sensors can be found in the kit.
|
|  | | IMG-318705 |
|
| | |
|  | | IMG-319043 |
|
| | |
|  | | IMG-319083 |
|
|  | | IMG-319084 |
|
|  | | IMG-319085 |
|
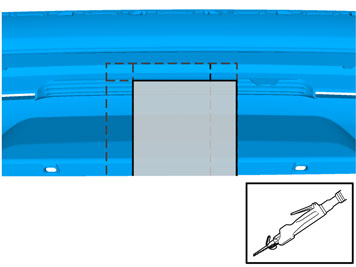
| | Applies to cars with a tow hitch Saw out the new lower section according to the markings. Remove the shaded area. Tape the outside to prevent the saw foot from damaging the paint.
Note!
Do not damage the paintwork of the bumper cover. |
Smooth off the sawn edges with a fine toothed file.
Image A - Detachable towbar Image B - Fixed towbar Image C - Hitch towbar |
|  | | IMG-319086 |
|
| | |
|  | | IMG-319087 |
|
| | Applies to cars with parking assistance Take new sensors from the kit and secure in the existing cradles.
Note!
The large gray connector must protrude from the right-hand side of the bumper cover. |
Connect the old cable harness to the sensors and secure with the clips in the cradles.
Note!
Two new clamps by the outer sensors. |
Secure the two centre clips at the lower edge on the collision member when reinstalling the bumper cover.
|
|  | | IMG-319088 |
|
| | Applies to cars with 4-cyl engine and 5-cyl diesel engine with single or twin silencers and FWD. |
|  | | IMG-319089 |
|
| | Applies to cars with 4-cyl engine and 5-cyl diesel engine and FWD with single silencer. |
|  | | IMG-319090 |
|
| | If necessary, smooth off the end of the pipe. Take the large clamp from the exhaust pipe kit and insert it on the exhaust pipe with the nuts pointing down.
|
|  | | IMG-319091 |
|
| | |
|  | | IMG-319092 |
|
| | Pull up the clamp so that it covers both pipe ends and is in the middle of the cutting point. Do not tighten yet. Position the clamp so that it can be accessed for tightening and is not at risk of chafing against nearby parts when the exhaust system moves.
|
|  | | IMG-319184 |
|
| | Applies to cars with 5-cyl diesel engine with twin silencers and FWD Note!
Request the assistance of a colleague to lower the silencers. |
|
| | | IMG-319090 |
|
| | If necessary, smooth off the end of the pipe. Take the large clamp from the exhaust pipe kit and insert it on the exhaust pipe with the nuts pointing down.
|
|  | | IMG-319187 |
|
| | |
|  | | IMG-319203 |
|
| | Take the appropriate right exhaust system from the kit. Position the clamp on the new exhaust pipe and insert the pipe on the previously installed exhaust system. Secure the rubber mounting in the new silencer. Do not tighten fully yet.
|
| | | IMG-319092 |
|
| | Pull up the clamp so that it covers both pipe ends and is in the middle of the cutting point. Do not tighten yet. Position the clamp so that it can be accessed for tightening and is not at risk of chafing against nearby parts when the exhaust system moves.
|
|  | | IMG-319226 |
|
| | Applies to cars with 5-cyl petrol engine, FWD and turbo, as well as 6-cyl engine FWD without turbo with twin silencers. |
|  | | IMG-319227 |
|
| | Note!
Request the assistance of a colleague to lower the silencers. |
|
|  | | IMG-319228 |
|
| | If necessary, smooth off the end of the pipe. Take the large cable tie from the exhaust pipe kit and insert it on the exhaust pipe with the nuts pointing down.
|
|  | | IMG-319229 |
|
| | |
|  | | IMG-319230 |
|
| | Take the appropriate right exhaust system from the kit. Position the clamp on the new exhaust pipe and insert the pipe in the pipe on the previously installed exhaust system. Secure the rubber mounting in the new silencer. Do not tighten the clamp fully yet.
|
|  | | IMG-319231 |
|
| | Pull up the clamp so that it covers both pipe ends and is in the middle of the cutting point. Do not tighten yet. Position the clamp so that it can be accessed for tightening and is not at risk of chafing against nearby parts when the exhaust system moves.
|
|  | | IMG-319165 |
|
| | Applies to cars with 5-cyl diesel engine and AWD, as well as 6-cyl engine FWD and AWD, with and without turbo, with single or twin silencers |
|  | | IMG-319183 |
|
| | |
| | | IMG-319184 |
|
| | Applies to cars with 6-cyl engine and 5-cyl diesel engine with twin silencers. Note!
Request the assistance of a colleague to lower the silencers. |
|
|  | | IMG-319186 |
|
| | If necessary, smooth off the end of the pipe. Take the large clamp from the exhaust pipe kit and insert it on the exhaust pipe with the nuts pointing down.
|
| | | IMG-319187 |
|
| | |
| | | IMG-319203 |
|
| | Take the appropriate right exhaust system from the kit. Position the clamp on the new exhaust pipe and insert the pipe on the previously installed exhaust system. Secure the rubber mounting in the new silencer. Do not tighten the clamp fully yet.
|
|  | | IMG-319185 |
|
| | Applies to cars with 5-cyl diesel engine and single silencer |
| | | IMG-319186 |
|
| | If necessary, smooth off the end of the pipe. Take the large clamp from the exhaust pipe kit and insert it on the exhaust pipe with the nuts pointing down.
|
|  | | IMG-319223 |
|
| | |
|  | | IMG-319224 |
|
| | Applies to all models Pull up the clamp so that it covers both pipe ends and is in the middle of the cutting point. Do not tighten yet. Position the clamp so that it can be accessed for tightening and is not at risk of chafing against nearby parts when the exhaust system moves.
|
|  | | IMG-273330 |
|
|  | | IMG-319233 |
|
| | Illustrations A and B Raise the bumper cover.
Note!
It is recommended that two people carry out this step to prevent damaging the bumper cover. |
Applies to all models Press the bumper's hooks in at the rear edge. Press all hooks for the ends into the body. Reinstall the screws on the front edges of the bumper cover, as well as the screws partially hidden by the wing liner. Reinstall the two rubber stops for the boot lid.
|
|  | | IMG-319234 |
|
| | Applies to cars with parking assistance, with or without towbar Turn the two centre clips on the cable harness for the sensors so that it is inside the compartment at the lower edge of the collision member. Take two new cable ties from the kit. Press the clips in the collision member on both sides. Tighten the cable ties. Reinstall the plastic nuts at the lower edge on the bumper cover.
Note!
Ensure that the long cable harness does not end up on top of the two centre cradles risking being trapped between these and the upper part of the collision member. |
|
|  | | IMG-319237 |
|
| | Applies to cars with double silencers |
|  | | IMG-319239 |
|
| | |
|  | | IMG-319240 |
|
| | Applies to cars with single silencer |
|  | | IMG-319241 |
|
| | |
|  | | IMG-242268 |
|
| | Applies to cars with rear parking assistance |