| | |
|  | | A8800136 |
|
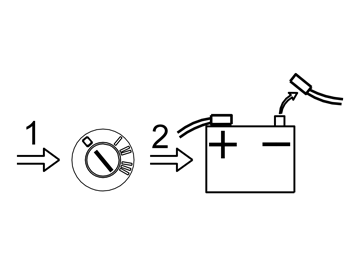
| | Interior preparations Move the right front seat to the rearmost position Turn the ignition key to position O Cars with manual gearboxes: Remove the ignition key.
Note!
Wait at least five minutes before disassembling the connectors or removing other electrical equipment. |
|
|  | | M8502988 |
|
|  | | D8502224 |
|
| | Illustration A applies to the S60 and the V70 Illustration B applies to the S80 |
|  | | M8503027 |
|
|  | | D8502684 |
|
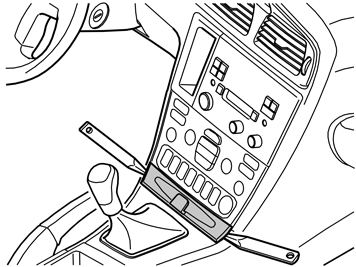
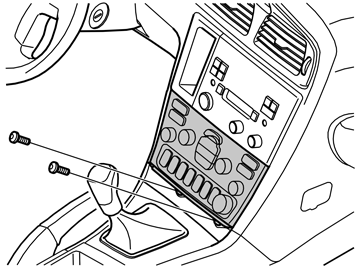
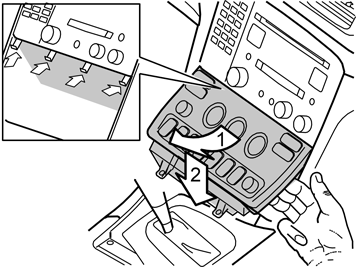
| | Illustration A applies to the S60 and the V70 Illustration B applies to the S80 Shift the gear selector lever into rearmost position Pull the panel (1) with the boot backward as far as possible Remove the screws (2) from the dashboard environment panel (3).
|
|  | | D8703093 |
|
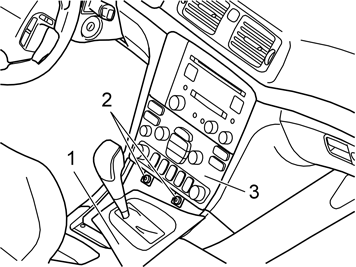
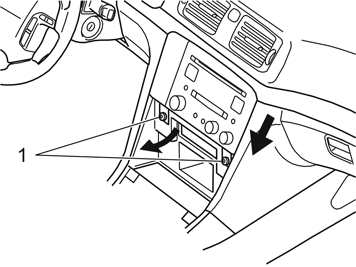
| | Angle the dashboard environment panel outwards so that it is possible to insert a couple of fingers between the centre console and the
side of the dashboard environment panel Pull the dashboard environment panel downwards while maintaining the same angle. Remove the dashboard environment panel. Some force is
required because the panel is tightly installed Disconnect the connectors on the reverse of the dashboard environment panel. Put the dashboard environment panel to one side.
Note!
If any of the outer hooks break off, these must be repaired. The method for this can be found in the Service Manual in the section
covering the dashboard. |
|
|  | | D8502145 |
|
| | Remove the screws (1) from the radio bracket Pull out the bracket with the radio (pull the lower corner while pressing downwards) Disconnect the radio connectors. Remove the bracket with the radio.
|
|  | | D8502413 |
|
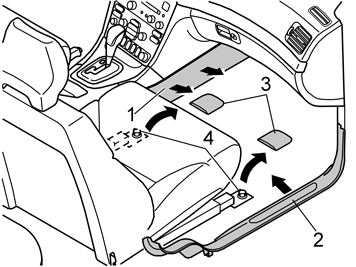
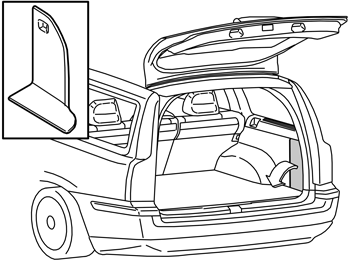
| | Remove: right side panel (1) by turning the screw clip at the rear edge of the panel half a turn. Pull the panel outwards and backwards the sill trim panel (2) at the right front door the covers (3) for the front seat mounting the two screws (4).
|
|  | | D8502414 |
|
| | |
|  | | M8503476 |
|
| | |
| | |
| | Applies to the V70 Illustration A Illustration B Illustration C |
|  | | M8503477 |
|
| | |
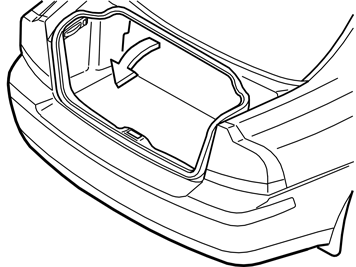
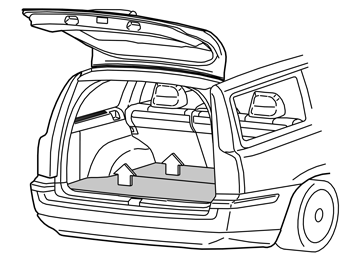
| | Cargo compartment preparations (S60) |
|  | | M8503480 |
|
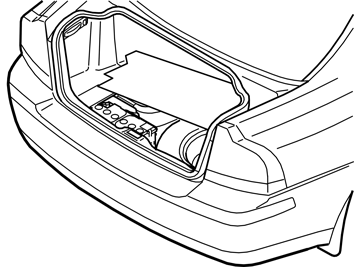
| | Cargo compartment preparations (S60) |
|  | | M8503481 |
|
| | |
|  | | M8503482 |
|
| | |
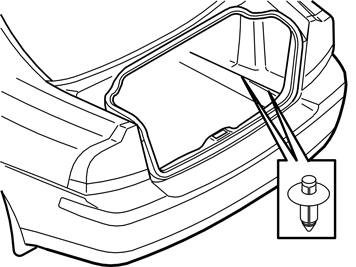
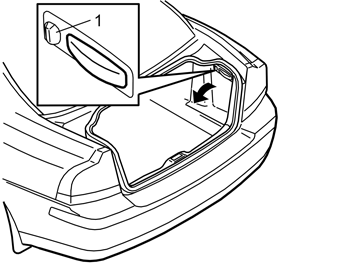
| | Cargo compartment preparations (S60 and S80) |
| | Cargo compartment preparations (S60 and S80) |
|  | | M8503478 |
|
| | |
|  | | M8503479 |
|
| | |
|  | | M8503483 |
|
| | |
| | Cargo compartment preparations (V70) |
|  | | M8503069 |
|
| | Cargo compartment preparations (V70) |
|  | | M8502718 |
|
|  | | M8503182 |
|
| | Illustration B applies to the V70 with an auxiliary rear facing seat |
|  | | M8503070 |
|
|  | | M8503205 |
|
| | Remove the right-hand side panel. First remove the cover and the screw at the front edge Pull the top edge of the panel out until the clips release Fold the panel inwards. Lift the panel out.
Illustration B applies to cars with an auxiliary rear facing seat Remove the right-hand side panel. First remove the cover and the screw from the front edge Pull the top edge of the panel out until the clips release Pull the seat belt out of the holder (1) Remove the safety cover. First bend out the hooks on the underside. Pull the cover straight up Fold the panel inwards. Lift the panel out.
|
| | Connection and finishing work |
|  | | D3701625 |
|
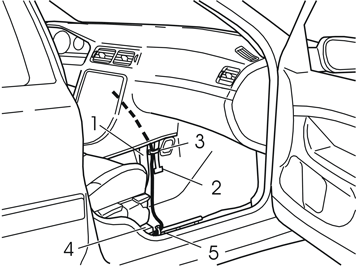
| | Connection and finishing work Note!
Check that the correct end of the antenna cable is routed to the radio tray. |
Route the antenna cable up between the front air duct (1) and the firewall stay (2) Route the cable through the radio compartment Secure the cable in the stay (3). Use a tie strap from the kit Route the cable above and along the front air duct to the seat mounting member (4) Clamp the wiring to the existing cable harness (5). Use a tie strap from the kit.
|
|  | | M3702363 |
|
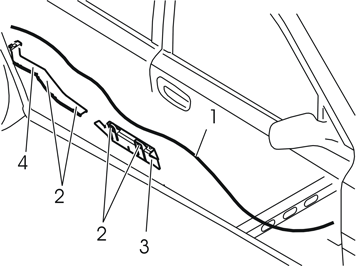
| | Route the cable (1) under the carpet along the right side of the car to the rear door Install protective caps on the lugs (2) for the cable ducts Route the cable above and along the front cable duct (3). Continue along the left-hand side of the rear cable duct (4).
|
|  | | D3701698 |
|
|  | | M3701942 |
|
| | Illustration A applies to the S60 and the S80 Illustration B applies to the V70 |
|  | | M3903267 |
|
| | Connect the cable (2) for the antenna amplifier (1) to the connector (3) for the antenna in the bumper Position the antenna amplifier on the edge of the panel in front of the right tail lamp as illustrated Tighten the antenna amplifier to the edge of the panel Connect the routed cable to the socket (4) on the antenna amplifier.
|
| | Clamp the cable along the cable duct in the cargo compartment. Use tie straps from the kit (see operation )
Reinstall the panels in the cargo compartment Reinstall the sill trim panel in the right-hand rear door Fold the seat cushion back into place Fold the backrest back into place Fold the right front floor carpet back into place.
Reinstall: the sill trim panel in the right front door the seat. Tighten the seat using the two new screws from the kit. Tighten to 40 Nm (29.5 ft.lb) the two covers the right side panel for the centre console.
|
|  | | D3701658 |
|
| | Note!
If there are two black electrical cables in the connector, remove the right-hand (looking from the back of the connector)
electrical cable. Secure the right-hand electrical cable. Install the new electrical cable. |
Connect the antenna cable to the two-pin connector (1), disconnected from the radio, to the spare terminal. Pry up the connector at the
rear edge. Pull out the green plastic catch (2) Insert the cable in the free terminal (3). Lock the cable in place using the catch.
|
| | Insert the radio in the radio tray. Connect the antenna cable and the connectors to the radio Reinstall the bracket with the radio. See point Connect the connectors to the dashboard environment panel. Reinstall the dashboard environment panel, see procedure and Reinstall the panel in front of the gear selector lever.
|
|  | | A8800137 |
|
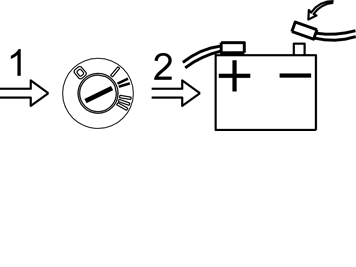
| | Turn the ignition key to position II Reconnect the battery negative lead Re-position the cargo compartment carpet Fold the rear floor hatch back into position.
|


