| | |
| | Read through all of the instructions before starting installation. Notifications and warning texts are for your safety and to minimise the risk of something breaking during installation. Ensure that all tools stated in the instructions are available before starting installation. Certain steps in the instructions are only presented in the form of images. Explanatory text is also given for more complicated steps. In the event of any problems with the instructions or the accessory, contact your local Volvo dealer.
|
| | |
|  | | IMG-400007 |
|
| | Note!
If a pending accessories installation include the removing and replacing of the bumper, this installation should be carried out first. |
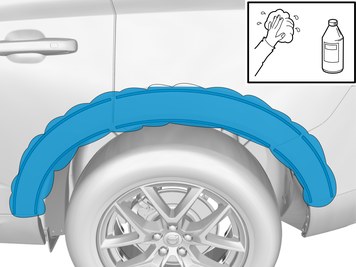
When installing, the car must retain a temperature of 20 degrees C. After installation, the car must not be washed for 48 hours |
| | |
|  | | IMG-363036 |
|
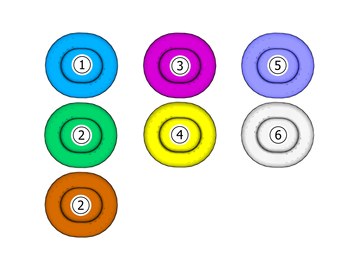
| | Note!
This colour chart displays (in colour print and electronic version) the importance of the different colours used in the images of the method steps. |
Used for focused component, the component with which you will do something. Used as extra colors when you need to show or differentiate additional parts. Used for attachments that are to be removed/installed. May be screws, clips, connectors, etc. Used when the component is not fully removed from the vehicle but only hung to the side. Used for standard tools and special tools. Used as background color for vehicle components.
|
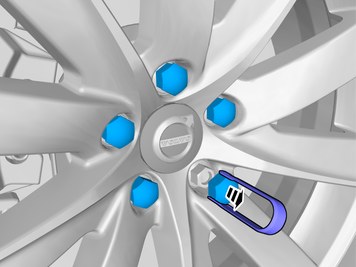
| | Applies to Battery Electric Vehicle (BEV) |
|  | | IMG-479249 |
|
| | Note!
Paint the sensors the same colour code as the vehicle. |
|
| | |
| | |
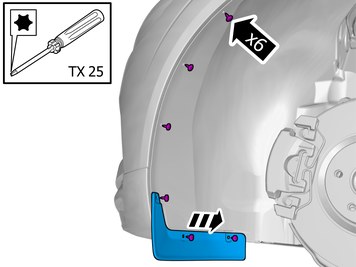
| | Vehicles with Parking assistance pilot |
|  | | IMG-403425 |
|
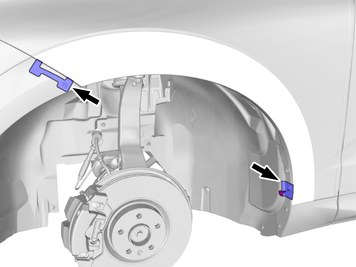
| | Remove the marked part. Use: Pliers
|
|  | | IMG-426018 |
|
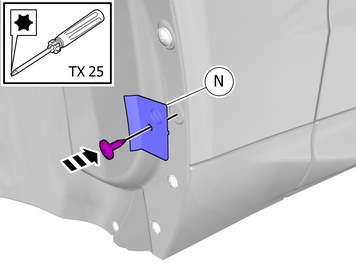
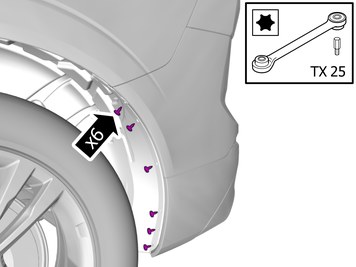
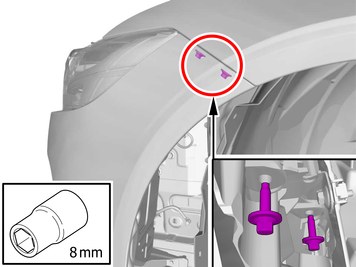
| | Remove the screws. Remove the marked part. |
|  | | IMG-426020 |
|
| | Remove the screws. Remove the marked part. |
|  | | IMG-426045 |
|
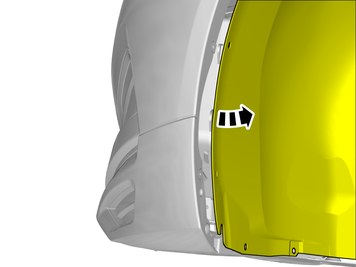
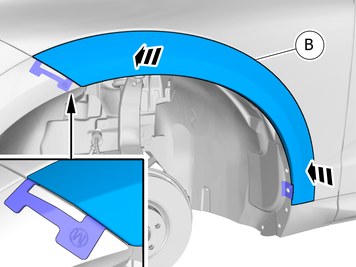
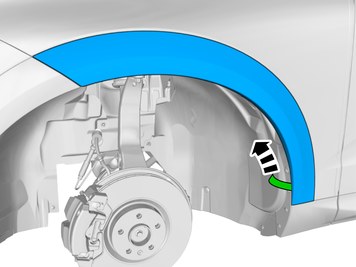
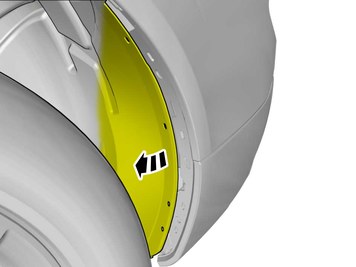
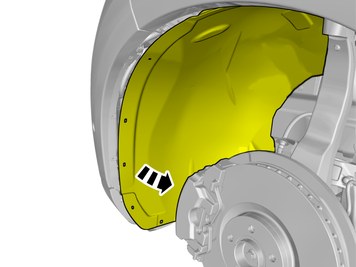
| | Fold the wing liner aside. |
|  | | IMG-426050 |
|
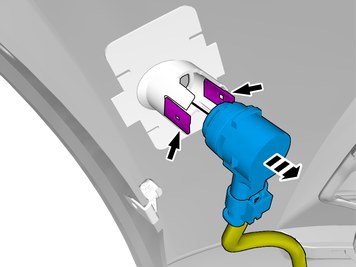
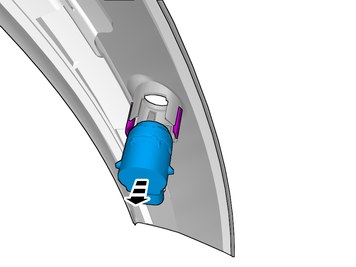
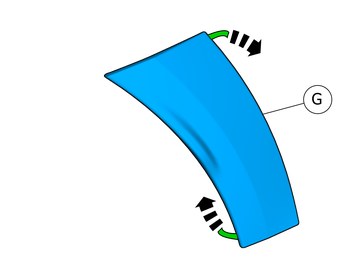
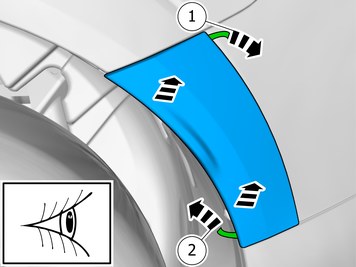
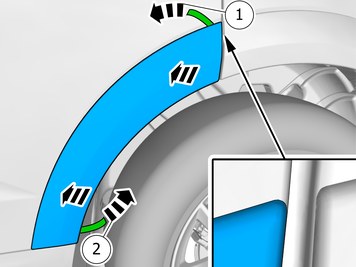
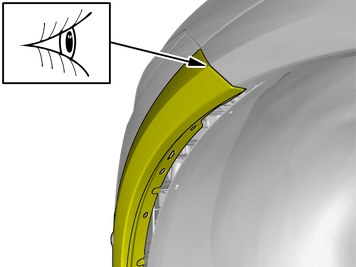
| | Release the catches. Loosen the component indicated. Do not remove it. |
|  | | IMG-426070 |
|
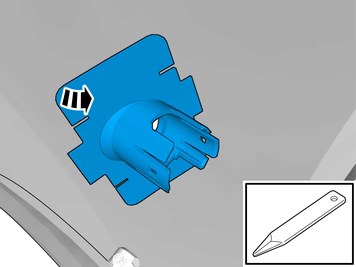
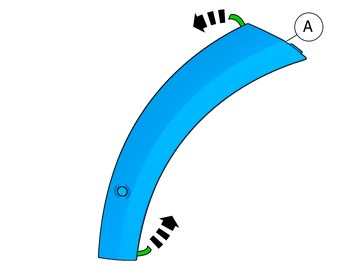
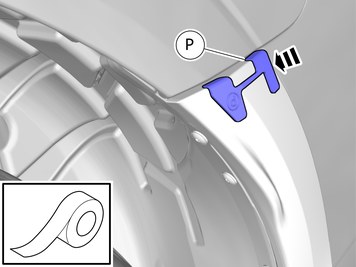
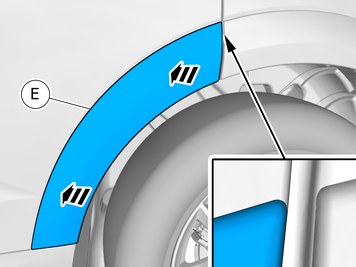
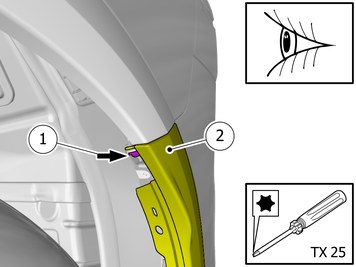
| | Remove the marked part. Use: Interior trim remover
The part is not to be reused. |
| | |
| | |
|  | | IMG-426078 |
|
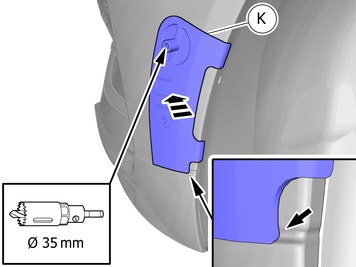
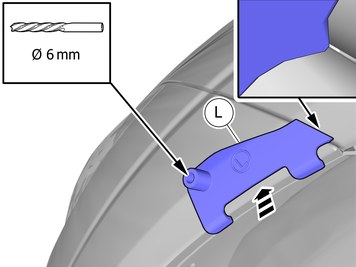
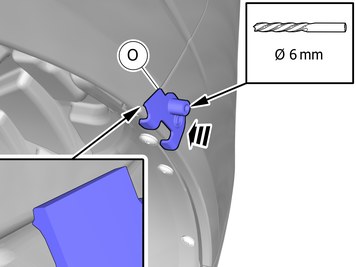
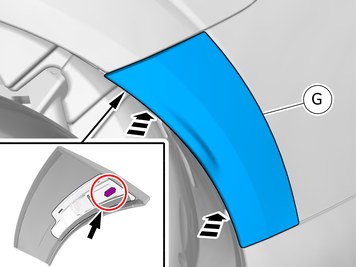
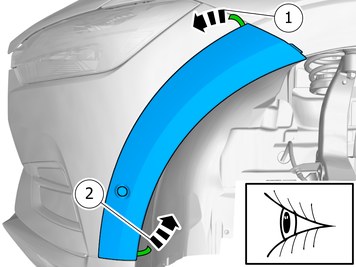
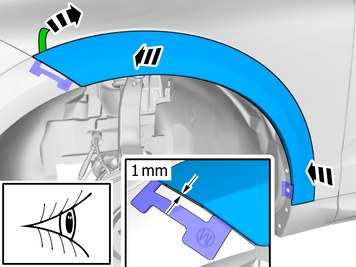
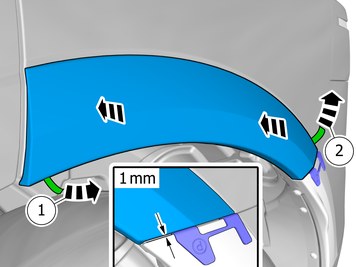
| | Note!
Make sure that the template is correctly located. |
Hold the component in the position shown. Make a hole, using the tool indicated. Remove the Special Tool. |
|  | | IMG-426095 |
|
| | Note!
Make sure that the template is correctly located. |
Hold the component in the position shown. Make a hole, using the tool indicated. Remove the Special Tool. |
|  | | IMG-426105 |
|
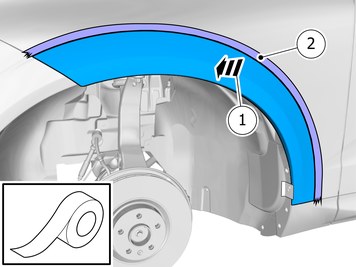
| | Clean the surfaces. Allow to dry. Use: 1161721, Isopropanol
|
|  | | IMG-426103 |
|
| | |
|  | | IMG-426104 |
|
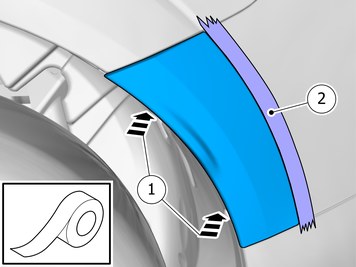
| | Install component that comes with the accessory kit. Reinstall the screw. |
|  | | IMG-426136 |
|
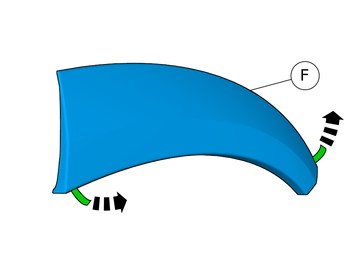
| | Install component that comes with the accessory kit. |
|  | | IMG-426137 |
|
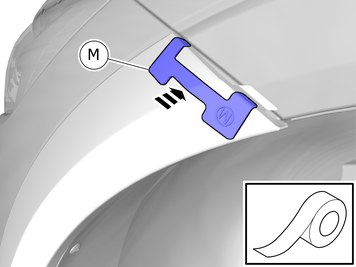
| | Note!
This step is easier with two people. |
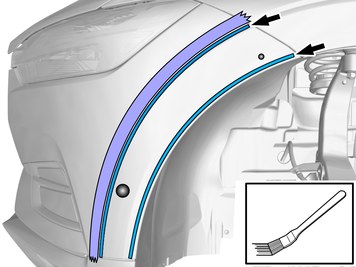
Hold the component in the position shown. Use: Masking tape
Remove the marked part. |
|  | | IMG-426165 |
|
| | Install component that comes with the accessory kit. |
|  | | IMG-426166 |
|
| | Note!
This step is easier with two people. |
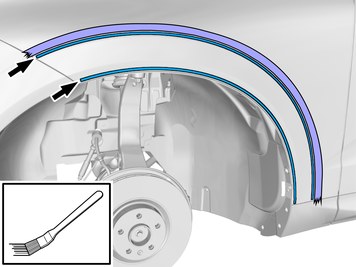
Hold the component in the position shown. Use: Masking tape
Remove the marked part. |
|  | | IMG-426170 |
|
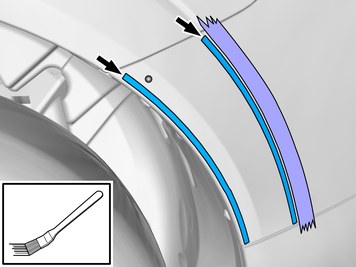
| | Apply a thin layer of primer. Allow to dry for at least 5 minutes but not more than 30 minutes. Use: 1161727, Primer
Remove the tape. |
|  | | IMG-426175 |
|
| | Apply a thin layer of primer. Allow to dry for at least 5 minutes but not more than 30 minutes. Use: 1161727, Primer
Remove the tape. |
|  | | IMG-426191 |
|
| | Note!
Make sure that the template is correctly located. |
Hold the component in the position shown. Make a hole, using the tool indicated. Remove the Special Tool. |
|  | | IMG-426185 |
|
| | Clean the surfaces. Allow to dry. Use: 1161721, Isopropanol
|
|  | | IMG-426260 |
|
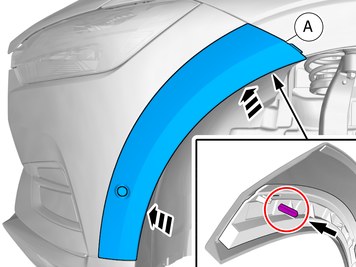
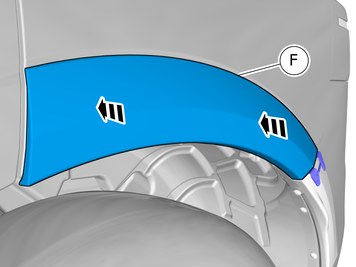
| | Install component that comes with the accessory kit. |
|  | | IMG-426262 |
|
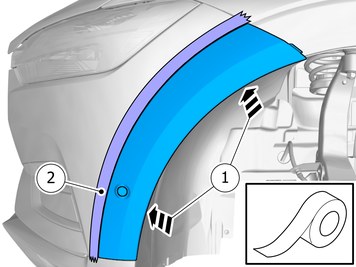
| | Note!
This step is easier with two people. |
Hold the component in the position shown. Use: Masking tape
Remove the marked part. |
|  | | IMG-426263 |
|
| | Apply a thin layer of primer. Allow to dry for at least 5 minutes but not more than 30 minutes. Use: 1161727, Primer
Remove the tape. |
|  | | IMG-426270 |
|
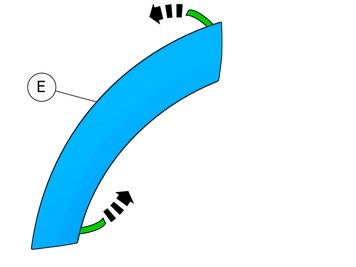
| | Install component that comes with the accessory kit. |
|  | | IMG-426275 |
|
| | Note!
This step is easier with two people. |
Hold the component in the position shown. Use: Masking tape
Remove the marked part. |
|  | | IMG-426276 |
|
| | Apply a thin layer of primer. Allow to dry for at least 5 minutes but not more than 30 minutes. Use: 1161727, Primer
Remove the tape. |
|  | | IMG-426280 |
|
| | Install component that comes with the accessory kit. |
|  | | IMG-426281 |
|
| | Note!
This step is easier with two people. |
Hold the component in the position shown. Use: Masking tape
Remove the marked part. |
|  | | IMG-426282 |
|
| | Apply a thin layer of primer. Allow to dry for at least 5 minutes but not more than 30 minutes. Use: 1161727, Primer
Remove the tape. |
|  | | IMG-426310 |
|
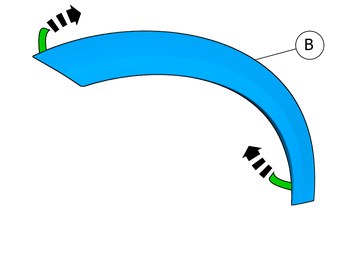
| | Fold the protective film forward |
| | Vehicles with Parking assistance pilot |
|  | | IMG-431030 |
|
| | Remove the marked part. The part is not to be reused. |
| | |
| | | IMG-426136 |
|
| | Install component that comes with the accessory kit. |
|  | | IMG-426311 |
|
| | Note!
Press and apply pressure to the part over the tape for at least 20 seconds. |
Note!
Ensure that the tape is fixed to the surface. |
Remove the protective film. |
|  | | IMG-426395 |
|
| | Install component that comes with the accessory kit. Secure the template with tape. Use: Masking tape
|
|  | | IMG-426332 |
|
| | Fold the protective film forward |
|  | | IMG-426396 |
|
| | Install component that comes with the accessory kit. |
|  | | IMG-426335 |
|
| | Note!
This step requires the aid of another technician. |
Note!
Adjust the position of the components to create even spaces. |
Remove the protective film. |
|  | | IMG-430895 |
|
| | Remove the screw. Remove the marked part. Reinstall the screw. |
|  | | IMG-430881 |
|
| | Note!
Press and apply pressure to the part over the tape for at least 20 seconds. |
Note!
Ensure that the tape is fixed to the surface. |
Remove the protective film. |
| | Applies to Battery Electric Vehicle (BEV) |
|  | | IMG-479124 |
|
| | Assemble components that come with the accessory kit. |
|  | | IMG-479180 |
|
| | Disconnect the connector. The part is not to be reused. |
|  | | IMG-479176 |
|
| | Install component that comes with the accessory kit. |
|  | | IMG-479177 |
|
| | |
| | |
|  | | IMG-426400 |
|
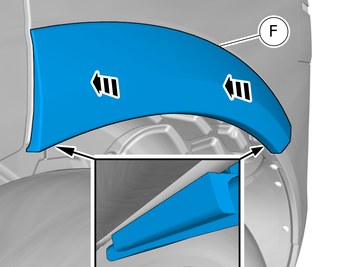
| | Fold the protective film forward |
| | | IMG-426260 |
|
| | Install component that comes with the accessory kit. |
|  | | IMG-426401 |
|
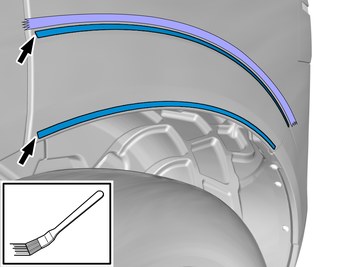
| | Note!
Press and apply pressure to the part over the tape for at least 20 seconds. |
Note!
Ensure that the tape is fixed to the surface. |
Remove the protective film. |
|  | | IMG-426405 |
|
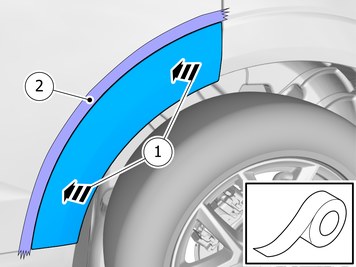
| | Install component that comes with the accessory kit. Secure the template with tape. Use: Masking tape
|
|  | | IMG-426410 |
|
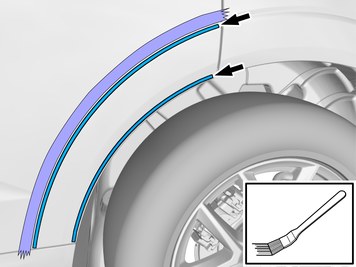
| | Fold the protective film forward |
|  | | IMG-426426 |
|
| | Install component that comes with the accessory kit. |
|  | | IMG-426420 |
|
| | Note!
Press and apply pressure to the part over the tape for at least 20 seconds. |
Note!
Adjust the position of the components to create even spaces. |
Remove the protective film. |
|  | | IMG-426430 |
|
| | Fold the protective film forward |
|  | | IMG-426436 |
|
| | Note!
Adjust the position of the components to create even spaces. |
Install component that comes with the accessory kit. |
|  | | IMG-426435 |
|
| | Note!
Press and apply pressure to the part over the tape for at least 20 seconds. |
Note!
Ensure that the tape is fixed to the surface. |
Remove the protective film. |
| | When necessary, carry out the following instruction. |
|  | | IMG-420406 |
|
| | |
|  | | IMG-420407 |
|
| | Fold the wing liner aside. |
|  | | IMG-431010 |
|
| | Note!
Adjust the position of the components to create even spaces. |
Loosen the screws. |
|  | | IMG-382211 |
|
| | Fold the wing liner aside. |
|  | | IMG-412715 |
|
| | Note!
Do not loosen the bolts more than one turn. |
|
|  | | IMG-431020 |
|
| | Note!
Adjust the position of the components to create even spaces. |
|
| | |
| | Reinstall the removed parts in reverse order. |
| | |
| | Repeat the steps when installing accessories on opposite side. |
|  | | IMG-242268 |
|
| | Download software (application) for the accessory's function according to the service information in VIDA. See VIDA or the accessories catalogue for software part number. |