| | |
|  | | IMG-352690 |
|
| | |
|  | | IMG-352746 |
|
| | |
|  | | IMG-346082 |
|
| | |
|  | | IMG-352601 |
|
| | |
| | | IMG-346082 |
|
| | |
|  | | IMG-352701 |
|
| | |
|  | | IMG-352606 |
|
| | Note!
Also read the instructions on the spray can. |
|
|  | | IMG-352695 |
|
| | |
|  | | IMG-346086 |
|
| | Caution!
Protect the connections' contact surfaces against paint. |
Paint the sensors in the same colour code as the vehicle. Use Volvo Touch-up paint. (Only use base coat.) Use: Volvo 2-K Varnish. P/N: 31335447.
Note!
Also read the instructions on the spray can. |
|
| | | IMG-352695 |
|
| | Paint the holders in the same colour code as the vehicle. Use Volvo Touch-up paint. (Only use base coat.) Use: Volvo 2-K Varnish. P/N: 31335447.
Note!
Also read the instructions on the spray can. |
Caution!
Too many layers of paint may result in partial or complete malfunction. |
|
| | Preparations, passenger compartment |
|  | | IMG-245980 |
|
| | Preparations, passenger compartment Note!
Wait at least three minutes before unplugging the connectors or removing other electrical equipment. |
|
| | |
|  | | IMG-240082 |
|
| | Note!
The steps show a left-hand drive car. For right-hand cars carry out the steps on the left-hand side of the car. |
|
|  | | J8400991 |
|
| | |
|  | | J8504868 |
|
| | |
|  | | J8504586 |
|
| | Applies to right-hand drive cars Remove the side cushion on both sides.
|
|  | | J8504733 |
|
| | |
|  | | J8504735 |
|
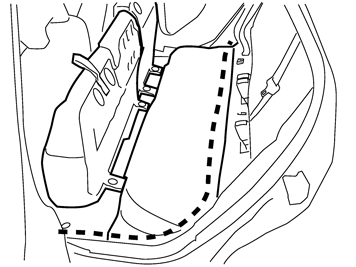
| | Pull off the rubber moldings at the rear edge of the right-hand front door and at the front edge of the right-hand rear door. This releases the lower panel on the B post. Pull the bottom edge of the lower panel on the B-pillar until the two bottom clips release.
|
|  | | IMG-240925 |
|
| | |
| | Cargo compartment, preparations |
|  | | J8504575 |
|
| | Cargo compartment, preparations Applies to the V50 |
|  | | IMG-240927 |
|
| | |
|  | | J8504570 |
|
| | Fold out the anchorage eyelets. Insert a scriber with an angled tip into the holes in the top of the covers (1). Turn the scriber so that the tip engages the reverse of the cover. Pull the covers off. Remove the screws from the anchorage eyelets. Remove the screw (2). Pull off the side panel at the top so that the two clips at the rear/bottom of the side window and the clip at the bottom of the D-pillar release. Disconnect the connector for the 12V socket, if present. Lift out the side panel.
|
| | |
|  | | J8504553 |
|
| | |
|  | | J8504554 |
|
| | Unscrew the two external clips at the front edge/bottom edge of the sill trim panel on the tailgate. Use a weatherstrip tool and pry up one corner of the sill trim panel so that the two clips in that end release. Pull up the sill trim panel at the other end so that the remaining two clips release. Remove the sill trim panel.
|
|  | | J8504584 |
|
|  | | IMG-240928 |
|
| | Illustration A Illustration B Remove the four clips (1), in illustration A, holding the side panel in the bodywork. Unhook the front edge of the parcel shelf panel at the mounting (2), in illustration A. Pull the side panel away from the parcel shelf panel and the panel on the C-post. Unhook the side panel from the mounting (3), in illustration B, on the underneath of the parcel shelf. Disconnect the connector for the 12V socket, if present. Unhook the side panel from the anchorage eyelets (4), in illustration A. Remove the side panel.
|
| | Preparations, bumper cover |
|  | | IMG-271329 |
|
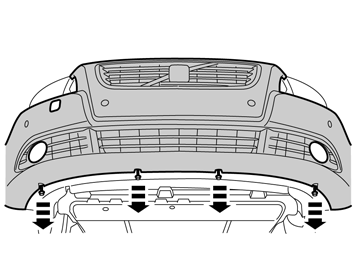
| | Preparations, bumper cover Applies to all models |
|  | | IMG-227800 |
|
| | |
|  | | J8601084 |
|
| | |
|  | | IMG-352812 |
|
| | |
|  | | IMG-271330 |
|
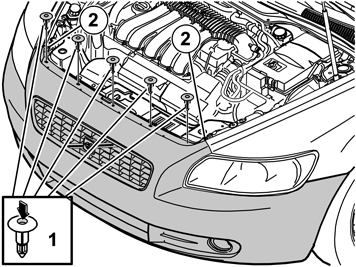
| | Locate the four markings on the inside of the bumper cover. Make a mark in the middle using a scriber. Drill at the markings using a Ø3 mm (1/8") drill bit. Drill from the inside of the bumper cover. Drill out the holes. Use a Ø8 mm (5/16") diameter drill bit.
|
| | |
|  | | IMG-271331 |
|
| | |
|  | | IMG-271332 |
|
| | |
|  | | IMG-352818 |
|
| | |
|  | | IMG-271333 |
|
| | Note!
On certain cars a foam member is available instead of the plastic member. |
Remove the foam member from the collision member. Make cut-outs for the inner sensors by sawing out according to the two markings through the entire thickness of the foam member. Reinstall the foam member.
|
|  | | IMG-271334 |
|
| | |
|  | | IMG-352703 |
|
| | |
| | Installing the sensor holders, sensors and cable harness |
|  | | IMG-229743 |
|
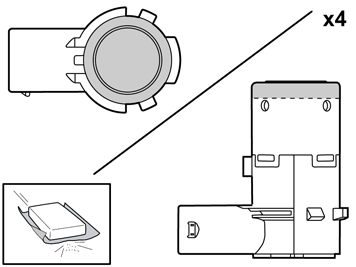
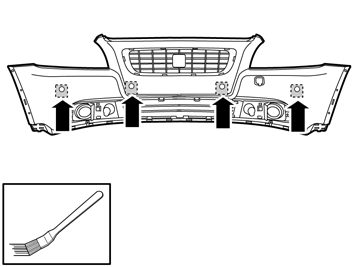
| | Installing the sensor holders, sensors and cable harness Install the sensor holders with the small part of the flange upward. The sensor holders' top edges must be in line and horizontal with the bumper. Press on the flange of each sensor holder so that the tape adheres.
Note!
The tape adheres immediately. Incorrect positioning of the sensor holders can result in the function being out of order completely or temporarily. |
|
|  | | IMG-229744 |
|
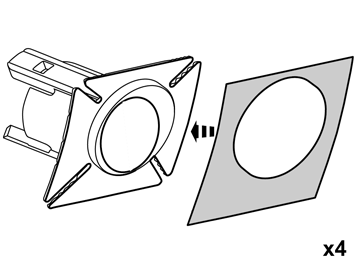
| | Take the cable harness from the kit and connect the connectors to the sensors. Place the sensor with straight connector to the left. A click should be heard when connecting. The noise confirms that the catch has locked. Install the four sensors so that they engage.
Note!
On left-hand drive cars the large gray connector must be on the right-hand side. On right-hand drive cars it must be on the left-hand side. |
|
|  | | IMG-271335 |
|
| | |
|  | | IMG-271336 |
|
| | Applies to right-hand drive cars Secure the rest of the cable harness to the butyl tape starting on the right-hand side.
|
| | Cable routing Note!
The steps show a left-hand drive car. For right-hand cars carry out the steps on the left-hand side of the car. |
|
|  | | J3703545 |
|
| | Take the short cable from the kit Pull the end with the loose terminal pins in under the headlamp Continue to pull the cable (1) along the right-hand side of the car, under the expansion tank down to the cowl panel. Route the cable so that it is concealed and cannot be damaged or worn. Secure the cable so that it does not move.
Note!
Ensure that the cable does not lie against any moving components or too close to heat sources. |
|
|  | | J2900414 |
|
| | Note!
The images display making holes from inside the passenger compartment on the right-hand cowl panel. |
|
|  | | J8504769 |
|
| | |
|  | | J8504770 |
|
| | |
|  | | J8504771 |
|
| | Pierce holes through the insulation and out into the engine compartment, for hole-marking in the insulation panel. Cut out a hole in the heat insulation that is approx. 20 mm larger than the size of the rubber grommet.
Applies to cars with fuel-driven parking heater: Caution!
Protect the coolant hose on the water pump's horizontal connection when hole-marking. |
|
|  | | IMG-235950 |
|
| | Take the rubber grommet from the kit and cut the top off the smaller rubber nipples Lubricate the rubber grommet. Use low temperature grease P/N 1161417. Thread the cable through the hole in the rubber grommet. Install the rubber grommet in the hole.
|
|  | | J2900389 |
|
| | Applies to cars with a passenger compartment heater and where an existing rubber grommet is used Cut off the top of one of the smaller rubber nipples Thread the cable through the hole in the rubber grommet.
|
|  | | J3703487 |
|
| | Pull the cable out through the rubber grommet Take the connector from the kit. Undo the catch. Install the cable end pins in the connector.
Blue (Blue, BL) Green (Green, GN) Violet (Violet, VO) Yellow (Yellow, Y) White (White, W) Black (Black, SB)
|
|  | | J8505029 |
|
| | |
|  | | IMG-251785 |
|
| | Applies to right-hand drive cars Fold back the rear seat's backrest temporarily. Pull the cable inside the floor carpets and the lower B post panel, over to the right-hand side.
|
|  | | J8504736 |
|
| | Caution!
Ensure that the cable is positioned so that there is no risk of it catching or rubbing. |
|
|  | | J3905094 |
|
| | Note!
Make sure that the connector clicks into place and is properly secured. |
|
|  | | IMG-271343 |
|
| | Hold the bumper up against the car and connect the connector for the sensor cable to the connector secured in the car. Secure the assembled connector on the member (1). Use a tie strap on each side of the connector Guide the bumper cover into the guides Slide the bumper cover into the correct position Reinstall the bumper cover by repeating the points for removing in reverse order.
|
| | |
|  | | IMG-242268 |
|
| | Finishing work Reinstall: the panel on the dashboard end face. The B-pillar panel and weatherstrips the sill trim panels side cushions the side panels in the cargo compartment the screws in the anchorage eyelets, tightening torque: 24 Nm (18 lbf.ft.) (applies to the V50) the sill trim panel for the tailgate. the luggage compartment mat
|