| | |
|  | | IMG-337061 |
|
| | |
|  | | IMG-284645 |
|
| | |
|  | | IMG-284646 |
|
| | |
|  | | IMG-284647 |
|
| | |
|  | | IMG-290249 |
|
| | |
|  | | IMG-284650 |
|
| | Note!
Take a piece of wiper hose. Tie a knot on it and install on the wiper pump to avoid spillage when the hose is removed. |
Fold back the wing liner. Loosen the connector and wiper hose to the headlight's high pressure washer. Seal off the outlet on the wiper pump.
|
|  | | IMG-284651 |
|
| | |
|  | | IMG-284652 |
|
| | Hint
Get help from a colleague for this procedure. |
|
|  | | IMG-337076 |
|
| | |
|  | | IMG-337077 |
|
| | Note!
Take care when measuring. |
Hang the bumper cover on the car to facilitate making holes. Apply a piece of tape in the middle of the centre catch for the lower grille. Ensure that it is in line with the direction of travel of the car.
|
|  | | IMG-337078 |
|
| | |
|  | | IMG-337540 |
|
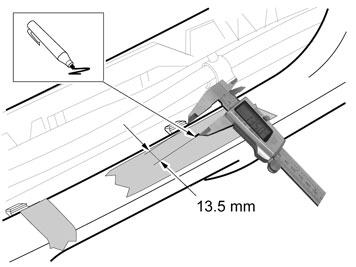
| | Now measure a distance of 13.5 mm from the inside of one of the outer catches and straight out, and mark this on the piece of tape. Start from the corner where the catch starts. Repeat for the other catch.
|
|  | | IMG-337541 |
|
| | |
|  | | IMG-337542 |
|
| | |
|  | | IMG-337543 |
|
| | |
|  | | IMG-337544 |
|
| | Take the trim strip and align the centre of its mark, which is on the inside lower edge, with the tape mark and place the strip's mounting lugs against the drawn lines. Mark on both sides of the lugs.
|
|  | | IMG-337545 |
|
| | |
|  | | IMG-337546 |
|
| | |
|  | | IMG-337547 |
|
| | |
|  | | IMG-337548 |
|
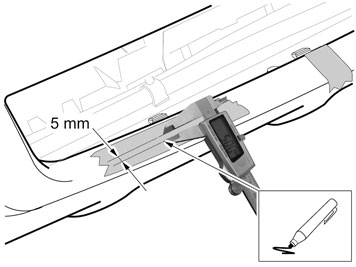
| | Mark out for drilling holes for the strip's lower lugs. Make a mark at the lower edge of the lugs. Repeat the operation on the other side.
|
|  | | IMG-337549 |
|
| | |
|  | | IMG-337550 |
|
| | |
|  | | IMG-337551 |
|
| | |
|  | | IMG-337553 |
|
|  | | IMG-337554 |
|
| | Illustrations A and B Take the trim strip and attach it in the bumper cover. Check that the strip locates easily and is against the bumper cover, and that the lugs do not catch the edges of the holes. Enlarge the holes carefully if necessary. Check that dimension A is the same on both sides. Adjust the rectangular holes as well if there is a big difference.
|
|  | | IMG-337558 |
|
| | |
|  | | IMG-337559 |
|
| | |
| | | IMG-337547 |
|
| | | IMG-337554 |
|
| | Take the trim strip, place its mounting lugs in the made holes and fold the strip towards the bumper cover. Check dimension A before the tape is pressed onto the bumper cover. Lift the bumper cover off, turn it with the front facing downward against a non-damaging surface
|
|  | | IMG-337562 |
|
| | |
|  | | IMG-337563 |
|
| | |
|  | | IMG-285263 |
|
| | Hint
Get help from a colleague for this procedure. |
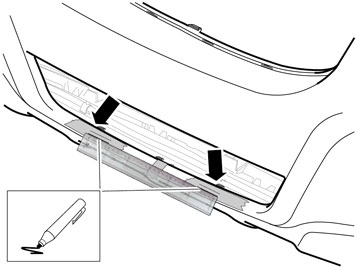
Connect the connectors for the fog lamps, if installed. Reinstall the bumper cover and make sure that all catches engage.
|
|  | | IMG-285264 |
|
| | |
|  | | IMG-285266 |
|
| | |
|  | | IMG-285267 |
|
| | |
|  | | IMG-285268 |
|
| | |
|  | | IMG-285269 |
|
| | |
|  | | IMG-285270 |
|
| | |