|  | | D8901068 |
|
| | Warning!
Do not, under any circumstances, slacken off or post-tighten the screwed joint (1) between the tow bar and the hitch. In the event of this occurring the screwed joint will
be damaged and safety will be compromised. It is also prohibited to weld the tow hitch, tow bar and screwed joint. |
|
| | |
|  | | D8502339 |
|
| | Push the cargo compartment carpet (1) to one side Turn the knob (2) for the side panels. Remove the clips and the plastic nut underneath the panels. Remove the panels Detach the two covers (3). Remove the screws (4) underneath the covers Grasp the outer edges of the panel (5). Pull the panel inwards towards the centre so that the clips release at the sides Disconnect the connectors (6) Remove the panel by pulling it straight upwards so that the clips release from the rear crossmember.
|
|  | | D3904303 |
|
|  | | D3904310 |
|
| | Applies to cars with RTI, CD changer or TV, or combinations of these Illustration A Illustration B |
|  | | D8101939 |
|
| | Remove the rubber seals in front of the nuts Remove the nuts (1) for the rear bumper Disconnect the connector (2) for the aerial.
|
|  | | D8600245 |
|
| | |
|  | | D8600246 |
|
| | |
|  | | D2500722 |
|
| | Remove: the rivet (1) on the bracket (2) for the silencer. Use cutting nippers the screws (3) on the bracket the bracket by detaching the rubber mountings (4). The bracket will not be used again.
|
|  | | D8600247 |
|
| | |
|  | | D8600359 |
|
| | Install masking tape on the outside of the bumper to avoid damage from the saw. Leave the masking tape in place throughout the installation procedure Cut out along inside of the flange (1), on the underside of the bumper, so that the flange stays in place in the bumper After cutting, even off the edges using a file.
|
|  | | D8901113 |
|
| | |
|  | | D8901071 |
|
|  | | D8901286 |
|
|  | | M8902166 |
|
|  | | D8901401 |
|
|  | | D8901069 |
|
| | Illustration A displays how the components for the hitch are assembled and mounted on the car body Illustration B displays how the brackets and cross member are assembled Illustration C displays how the nut washer is positioned in the side member Illustration D displays how the sleeve and washer is positioned in relation to the spare wheel well Illustration E displays the mounting for the silencer Illustration A, B Install the outer screws (2) and the member (1) from the underneath of the brackets (4, 5). Install the outer nuts (3) from the upperside. Do not tighten Install the inner screws (2) and the member (1) from the upperside of the brackets (4, 5). Install the inner nuts (3) from underneath. Do not tighten Hang up the tow hitch and screws (10) and the sleeves (6).
Illustration B, C Install the screws (11), the sleeves (6), the sleeves with washer (12) and the nut washers (13) Check that the nut washer (13) is positioned against the bottom of the frame member before tightening the screw (11) Install the screw (9) on the right-hand side of the tow hitch.
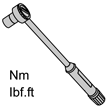
Illustration B Check that the distance between the member (1) and the spare wheel well is 8 mm (5/16”). Centre the tow hitch to the car Tighten the screws (9, 10). Tighten to 79 Nm (59 lbf.ft.) Tighten the screw (2). Tighten the nut (3). Tighten to 87 Nm (65 lbf.ft) Tighten the screw (11). Tighten to 120 Nm (90 lbf.ft.) Ensure that the washer on the sleeve (12) is parallel to the spare wheel well. (Illustration D).
|
| | |
| | |
|  | | D8600249 |
|
| | Reinstall: the bumper. Locate the ends of the bumper (1) in the rails (2). Push the bumper in the wheel nuts. Tighten to 18 Nm (14 lbf.ft) the rubber seal the connector for the aerial.
|
|  | | D8600250 |
|
| | |
|  | | D8903122 |
|
|  | | D8600278 |
|
| | Illustration A Illustration B |
|  | | D8901070 |
|
|  | | D8901072 |
|
| | Illustration A applies to installation of the tow hitch Illustration B displays locking the tow hitch Check that the indicator pin (2) is in the inner position and that the handle (1) is horizontal Turn the lock cylinder (3) to the position illustrated. The plastic cover (4) protects the lock cylinder.
|
|  | | D8600407 |
|
|  | | D8600854 |
|
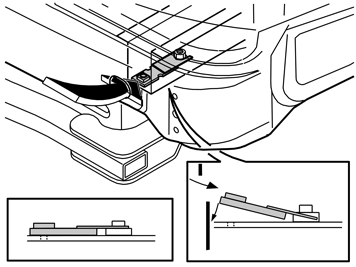
| | Illustration A applies to all cars except Bi-fuel Remove the tow hitch. Place the tow hitch in the protective bag Place the tow hitch in the spare wheel as illustrated Lower the tow hitch so that the handle aligns with one of the holes in the rim Insert the strap into the two closest holes in the rim. Route the strap around the tow hitch, between the handle and the tow hitch itself Insert the strap into the tensioner. Tighten the tensioner until the tow hitch is secured.
Illustration B only applies to Bi-fuel cars Applies to the first time Remove the cover on the storage compartment by the battery Grasp the front edge of the lower section of the compartment. Pull the compartment backwards. At the same time lift the front edge upwards. Lift the entire compartment Thread the strap from the tow hitch kit through the groove underneath and up to the top Reinstall the compartment.
Proceed as follows Remove the tow hitch. Place the tow hitch in the protective bag Position the tow hitch to the left in the compartment. Align the tow hitch Tighten the tow hitch properly using the strap. Ensure that the hitch is secure Reinstall the cover on the compartment. Check that it is secure.
|
|  | | D8901073 |
|
| | |
|  | | D8301078 |
|
| | |
| | |
| | Reinstall: the side panels and the clips the panel on the rear crossmember and the connectors the cargo compartment carpet.
|