Installation Instruction

Installation instructions, accessories
Volvo Car Corporation Gothenburg, Sweden
850 1992, 850 1995, 850 1997, S70 1998, 850 1993, V70 (-00) 1997, V70 (-00) 1998, 850 1996, C70 Coupe (-02) 1998, C70 Conv (-05) 1998, 850 1994, S70 1997, S70 1999, V70 (-00) 1999, C70 Conv (-05) 2001, C70 Conv (-05) 1999, C70 Conv (-05) 2000, C70 Coupe (-02) 2001, V70 (-00) 2000, C70 Coupe (-02) 1999, S70 2000, C70 Conv (-05) 2002, C70 Coupe (-02) 2000, C70 Conv (-05) 2003, C70 Coupe (-02) 2002, C70 Conv (-05) 2004, S40 (-04) 1998, V40 (-04) 1998, S40 (-04) 2000, V40 (-04) 2000, S40 (-04) 2003, 940 1991, S40 (-04) 2002, S40 (-04) 1996, V40 (-04) 2002, V90 (-98) 1997, S40 (-04) 1999, S40 (-04) 2001, V70 XC (-00) 1998, S40 (-04) 2004, V40 (-04) 1999, 960 1991, V40 (-04) 2004, V40 (-04) 1996, V40 (-04) 2003, S40 (-04) 1997, 940 1997, V70 XC (-00) 2000, V40 (-04) 1997, V40 (-04) 2001, 960 1996, 960 1997, V70 XC (-00) 1999, 940 1994, 960 1993, 960 1995, 960 1992, S90 (-98) 1997, 960 1994, 940 1992, 940 1995, 940 SE 1991, 940 1993, S80 (-06) 2002, V70 XC (01-) / XC70 (-07) 2004, S60 (-09) 2002, S60 (-09) 2003, S60 (-09) 2001, S80 (-06) 2004, V70 XC (01-) / XC70 (-07) 2003, S80 (-06) 2001, S80 (-06) 2003, V70 (00-08) 2004, XC90 (03-) 2004, V70 (00-08) 2001, V70 XC (01-) / XC70 (-07) 2001, S80 (-06) 2000, V70 XC (01-) / XC70 (-07) 2002, V70 (00-08) 2000, XC90 (03-) 2003, S80 (-06) 1999, S60 (-09) 2004, V70 (00-08) 2002, V70 (00-08) 2003, 940 1996, S90 (-98) 1998, V90 (-98) 1998, 940 1998, 940 SE 1992, S40 (04-) 2004, V50 2004, S80 (-06) 2005, V70 XC (01-) / XC70 (-07) 2005, S60 (-09) 2005, S40 (04-) 2005, V50 2005, V70 (00-08) 2005, XC90 (03-) 2005, C70 Conv (-05) 2005

Instruction NoVersionPart. No.Click to download PDF-version of this Installation Instruction
306606021.0
Installation kit for auxiliary lamps


M3501113


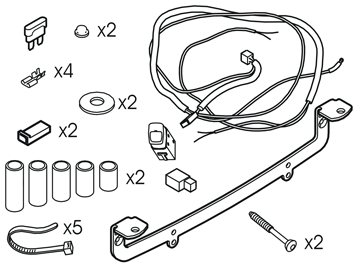
Equipment
A0000162
A0000163
A0000236

M3603420


INTRODUCTION

  • Read through all of the instructions before starting installation.

  • Notifications and warning texts are for your safety and to minimise the risk of something breaking during installation.

  • Ensure that all tools stated in the instructions are available before starting installation.

  • Certain steps in the instructions are only presented in the form of images. Explanatory text is also given for more complicated steps.

  • In the event of any problems with the instructions or the accessory, contact your local Volvo dealer.


Note!

Auxiliary lamps Alpha 175 (P/N. 9166090) are recommended for this installation kit.


Preparations at the front of the car

1
 

Preparations at the front of the car

    Applies to cars with manual gearboxes:

  • Turn the ignition key to position “0”. Remove the ignition key from the ignition switch.

    Applies to cars with automatic gearboxes:

  • Turn the ignition key to position “0”.

    Applies to all cars:

  • Disconnect the battery negative lead.


    Note!

    Wait at least five minutes before disconnecting the connectors or removing other electrical equipment.


2A
M8600655
2B
M8600653
 

Illustration A applies to the V70

Illustration B applies to the S60 and the V70 XC

  • Press in the centre of the six clips until a click is heard. Remove the clips

  • Pull the top edge of the front panel forwards

  • Insert your hand in the inside. Press the four catches along the top edge upwards (applies to the V70, illustration A) or downwards (applies to the S60 and the V70 XC, illustration B). Use a weatherstrip tool if necessary

  • Pull the top edge of the front grille outward until the catches release.

3A
M8600597
3B
M8600657
 

A. Applies to the V70

  • Detach the lower edge of the front grille by inserting a small screwdriver between the gaps and pressing down the three catches

  • Remove the front grille. Place the grille to one side.

B. Applies to the S60 and the V70 XC

  • Insert a plastic weatherstrip tool between the front grille and the bumper cover. Carefully pry off the radiator grille along the lower edge. The grille is secured with three catches

  • Remove the front grille. Place the grille to one side.

4
M2501081
 

  • Remove the intake manifold (1).

5
M2000292
 

  • Lift up the air filter module. First detach the air filter module from the three mountings: one at the rear edge, one at the front edge and one at the left-hand end. Use a small socket with an extension bar to compress the four catches. Detach the air cleaner module.

6
M2501083
 

  • Push the air cleaner module to one side. Secure the module using string as illustrated.

7
M3501100
 

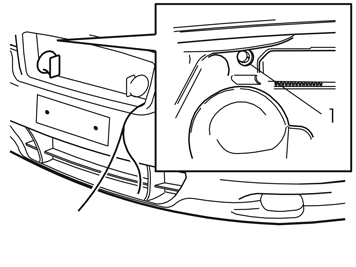
  • Push the rubber seal (1) (on the left inside of the grille) to one side. Take the cable harness (2) from the kit. Position the cable harness in the engine compartment. Route the cable harness at the left-hand headlamp by the upper edge and through the cut-out in the car body by the rubber seal

  • Push the rubber seal back into place. Ensure that it provides a good seal.

8A
M8200157
8B
M8600598
 

A. Applies to the V70

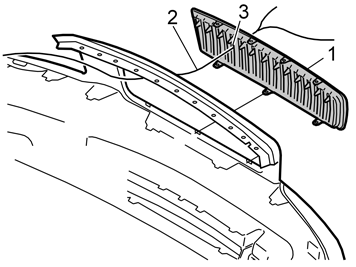
  • Take the front grille (1). Insert the cable harness (2) through the sixth hole (3), from the left headlamp.

B. Applies to the S60 and the V70 XC

  • Take the radiator grille (1). Insert the cable harness (2) through the second hole at the bottom, counted from the left headlamp.

    Applies to all models:

  • Reinstall the front grille. Reinstall the clips that hold the top edge of the front panel.

9
M8600599
 

    Remove:

  • the number plate

  • the screws (1) for the number plate holder. Remove the number plate holder.


Installing the auxiliary lamps

10
M8600600
 

Installing the auxiliary lamps

  • Secure the auxiliary lamp bracket (1) from the kit in the holes (2) for the number plate holder. S60 and V70: Use the lower holes in the bracket.V70 XC: Use the upper holes in the bracket

  • Drill using a 7mm (9/32") diameter drill bit. Drill the centre of the holes (3). Drill through the bumper cover and the bumper rail (which are positioned differently depending on the model):

    Applies to cars of model year -2004

  • S60: approximately 37 mm (1.46”) in front of the cover V70: approximately 52 mm (2.05") in front of the cover V70 XC: approximately 51 mm (2.01") in front of the cover


    Note!

    Hold the drill horizontally.


    Applies to cars from model year 2005-

  • S60: approximately 58 mm (2.28”) in front of the cover V70: approximately 61 mm (2.40") in front of the cover V70 XC: approximately 51 mm (2.01") in front of the cover


    Note!

    Hold the drill horizontally.


  • Remove the screws and the auxiliary lamp bracket.

11
D3500968
 

  • Drill the holes (1) using a drill bit (P/N 8633152). Drill through the plastic using the thicker section of the drill bit. Drill through the bumper rail (2) using the smaller section of the drill bit (Ø 7.3 mm (19/64")).


    Note!

    It is important that the tip of the drill bit meets the hole that was previously drilled into the bumper rail.


  • The flat surface of the drill bit must drill out all the plastic up to the bumper rail.


    Note!

    Hold the drill horizontally. Using a torch, check that there is no plastic swarf in the holes.


12A
M8600658
12B
M8601192
 

Illustration A

    Applies to cars of model year -2004

  • Check that there is no plastic in the area (1) on which the spacers will rest

  • Install the two spacers in the holes;S60: Length approximately 40 mm (1.57”) V70: Length approximately 53.5 mm (2.11") V70 XC: Length approximately 60 mm (2.36")


    Note!

    The spacers must protrude at different lengths from the bumper cover, depending on the model. S60: approximately 3 mm (0.12”) out of the bumper cover V70: approximately 1 mm (0.04") out of the bumper cover V70 XC: approximately 9 mm (0.35") out of the bumper cover


Illustration B

    Applies to cars from model year 2005-

  • Check that there is no plastic in the area (1) on which the spacers will rest

  • Install the two spacers in the holes;S60: Length approximately 60 mm (2.36”) V70: Length approximately 63.5 mm (2.5") V70 XC: Length approximately 60 mm (2.36")


    Note!

    The spacers must protrude at different lengths from the bumper cover, depending on the model. S60: approximately 2 mm (0.08”) out of the bumper cover V70: approximately 2 mm (0.08") out of the bumper cover V70 XC: approximately 9 mm (0.35") out of the bumper cover


13
M8600659
 

Applies only to the S60 and the V70:

  • Drill two new holes in the number plate holder as illustrated.

  • 14
    M3501038
     

    • Secure the tie straps (1) in the holes in the auxiliary lamp bracket. Do not tighten

    • Install the auxiliary lamp bracket on the bumper using the screws (2) from the kit. Finger tighten. The screws are self-tapping so it may be hard to screw them in.

    15
    M3501039
     

    • Insert the two cable ends (1) in the three tie straps (2). Route the wiring as illustrated

    • Adjust the cable lengths for the lamps. Press any excess cable outside the grille back into the grille

    • Tighten the tie straps.


      Note!

      Tighten the two screws for the auxiliary lamp bracket.


    • Install a spacer washer (3) between the auxiliary lamp bracket (4) and the expander nut (5) on both sides

    • Install the number plate. Secure the number plate using the two screws.

    16
    A3500379
     

    Use auxiliary lamps recommended by your Volvo dealer.

    • Remove the screw (1) and cover

    • Press lightly on the lens (2)

    • Position a screwdriver (3) between the insert and lamp housing and pry gently.

    17
    M3501040
     

    • Install the lamp housing on the auxiliary lamp mounting. Use a screw and nut. Finger tighten.

    18
    M3501041
     

    • Route the cable harness (1) with the rubber grommet (1) into the holes in the lamp housing

    • Press the rubber grommet into place in the hole.

    19
    D3500974
     

    • Connect the blue (BL) cable to the lamp cable via a socket housing

    • Connect the black (SB) cable to ground on the lamp insert.

    20
    A3500386
     

    • Assemble the auxiliary lamp as illustrated.

    21
    M3501101
     

    • Route the previously routed cable harness (1) as illustrated

    • Connect the connector (2) to the existing connector

    • Press the relay (3) into place by the edge of the panel

    • Slacken off the existing screw (4) in the bracket for the air cleaner module. Connect the ground lead. Pull any cable excess through the grille. Secure the excess at the existing wiring behind the headlamps using the tie straps from the kit

    • Reinstall the air cleaner module and intake pipe.


      Note!

      Ensure that the wiring does not rub against sharp edges. If the wiring is rubbing, re-secure the wiring.


    22
    M3702189
     

      Applies to cars of model year -2004

    • Remove the cover from the fuse holder in the engine compartment. Install a 20A fuse in position 2 (1)

    • Reinstall the cover.


    Installing switches in model year -2004 cars

    23
    M8502988
     

    Installing switches in model year -2004 cars

      Model year -2004

    • Remove the panel in front of the gear selector lever. Pry off the panel using a plastic weatherstrip tool

    • Apply the handbrake. Move the gear selector lever as far back as possible.

    24
    M8503027
     

      Model year -2004

    • Remove the two screws from the dashboard environment panel.

    25
    M8503045
     

      Model year -2004

    • Carefully angle the dashboard environment panel out using a plastic weatherstrip tool so that it is possible to insert a couple of fingers to gain access to the side of the dashboard environmental panel

    • Remove the dashboard environment panel. Pull the dashboard environment panel downwards while maintaining the same angle. Some force is required because the panel is tightly installed

    • Disconnect the connectors on the reverse of the dashboard environment panel. Place the dashboard environment panel to one side.


      Note!

      If any of the outer hooks break off, these must be repaired. See the section dealing with the dashboard in the Workshop manual in VIDA.


    26
    M8503159
     

      Model year -2004

    • Remove the cigarette lighter

    • Position the dashboard environmental panel as illustrated

    • Detach the surround (1) by carefully pushing down the three catches (2) in the holes (3). Use a small screwdriver. At the same time pry out the surround using a thin weatherstrip tool. Starting at the 12 volt socket (4), pry up one corner. The surround is well secured so do not damage any components.


      Note!

      The surround with three button spaces can be replaced with a surround with seven button spaces if necessary. This can be purchased separately.


    Installing switches in model year 2005- cars

    27
    M3904985
     

    Installing switches in model year 2005- cars

      Model year 2005-

    • Remove the blind cover plug from the 12-V socket.

    28
    M3904986
     

      Model year 2005-

    • Carefully remove the switch panel. Use a scriber with an angled point. Pull out one corner of the panel using the scriber. Pull until the hooks release. It is secured by three hooks on each long side. Continue to pull down with the panel until all the mounting hooks have released.

    29
    D8502226
     

      Model year 2005-

    • Remove the switch blank. Install the new switch (1) in any location

    • Reinstall the surround and the cover plug.


    Finishing work, alignment and adjusting

    30
     

    Finishing work, alignment and adjusting

    • Set the auxiliary lamps for optimal light distribution

    • Tighten the two screws. See point

    • Install protective caps on the screw heads.

    31
    M3000486
     

    • If the lamps vibrate excessively, a top stay can be installed. Secure the stay to the horn mounting (1).

    32
     

    • Turn the ignition key to position “II”.

    • Reconnect the battery negative lead

    • Reinstall the floor support in the cargo compartment.