| | |
|  | | A8800136 |
|
| | |
| | |
|  | | M8301410 |
|
|  | | M3100090 |
|
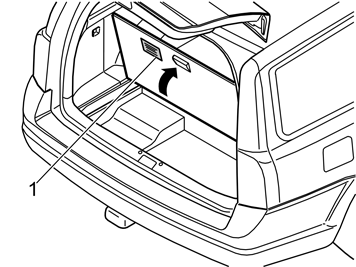
| | Illustration A Lift up and remove the floor hatch (1). Lift up and remove the storage cover (2). Remove the side panel (3) on the left-hand side.
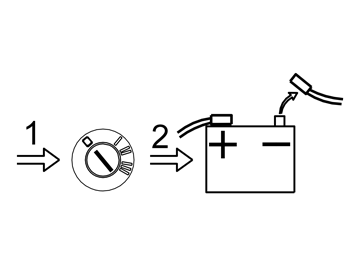
Illustration B Remove the holder for the cover over the battery by removing the two nuts from the front edge of the battery holder. Unscrew the screw in the rear edge a few turns. Remove the holder. Remove the battery cover. Disconnect the battery negative lead. Move or remove the battery to facilitate access.
|
|  | | M8101064 |
|
|  | | IMG-213364 |
|
| | Illustration A Remove the perforated sections (3) in the lining mat. Remove the nuts (1) in the rear crossmember. This allows the bumper to be removed. Separate the connector (2) for the antenna.
Illustration B Applies to cars with parking assistance Detach the parking assistance module (PAM) from its location on the member on the left-hand side of the cargo compartment. Detach the smaller connector from the control module.
|
|  | | M8600564 |
|
| | Applies to cars with rear mudflaps Remove the rear wheels. Carefully drill out the rivets holding the mudflap on both sides. Use a Ø6 mm (1/4") diameter drill bit. Remove the mudflaps.
|
|  | | M8600565 |
|
| | Applies to cars up to and including model year –2004 (CH -458999) Carefully drill out the rivets (2) underneath the bumper on both sides. Use a Ø 6 mm (1/4") diameter drill bit. Remove the screw (1) holding the wheel arch liner for the bumper cover on both sides. Do not damage any of the plastic components.
|
|  | | M8600494 |
|
| | Applies to cars up to and including model year –2004 (CH -458999) Check if the car has clips Remove the clips (1) underneath the bumper cover by pressing in the centre of the clip until a clicking sound is heard. Remove the clips. The clips shall be re-used.
Applies to all models Pull the bumper backwards slightly. Bend out the sides (2) so that they detach from the mounting (3). Then pull the bumper backwards until it detaches completely. Place the bumper on a clean underlying surface that will not damage the paint.
Applies if the car has moulding Carefully remove the moulding (4) from the expander screws.
|
|  | | IMG-229822 |
|
| | Applies to cars from and including model year 2005 (CH459000-) Remove the screw (1) in the upper edge of the end face on both sides. Remove the screw (2) in the lower edge of the wheel arch on both sides. Push in the centre of the four clips on the underside of the bumper cover. Remove the four clips by pulling them through the holes. Place the bumper on a clean underlying surface that will not damage the paint.
|
|  | | IMG-213367 |
|
| | Applies to cars with parking assistance Detach the bumper in accordance with the above. Carefully pull the cable (1) out through the hole in the car.
|
|  | | D2500722 |
|
|  | | D8600247 |
|
| | Illustration A Remove the rivet (1) on the bracket (2) for the silencer. Use cutting nippers. Remove the screws (3) on the bracket. Remove the rubber mountings (4). Remove the bracket. The bracket will not be used again.
Illustration B |
|  | | J8601270 |
|
|  | | M8601281 |
|
| | Illustration A Applies to V70, V70R from and including model year 2005– (CH 459000–), Europe and Australia Cut along the markings on the inside of the bumper to make the cut-out for the towbar. Cut out so that the marking lines remain in the bumper afterwards.
Illustration B Applies to the Australian towbar with chain mountings. Install masking tape opposite the smaller cutting lines (2). Drill a hole inside each marking for the blade of the jig saw. Cut the material out inside the marking lines. After cutting, smooth off the edges using a file.
|
|  | | M8903417 |
|
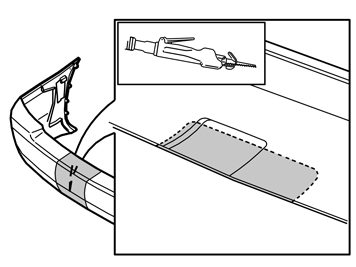
| | Applies to V70R up to and including model year –2004 (CH -458999) Apply masking tape on the outside of the exhaust pipe clip to avoid damage from the base of the saw. Leave the masking tape in place during installation. Cut along the marked raised area and remove the cut-out area.
|
|  | | M8601259 |
|
|  | | M8601280 |
|
| | Illustration A Applies to cars up to and including model year –2004 (CH -458999) Use the cutting template from the kit to pre-mark the cutting lines on the inside of the bumper. Position the cutting template as illustrated. Carefully mark out the cutting lines around the cutting template. Cut along the markings on the inside of the bumper to make the cut-out for the towbar. Cut out so that the marking lines remain in the bumper afterwards.
Illustration B Applies to the Australian towbar with chain mountings. Use the smaller cutting templates from the kit to pre-mark the cutting lines on the inside of the bumper. Position the cutting template as illustrated. Install masking tape opposite the smaller cutting lines. Drill a hole inside each marking for the blade of the jig saw. Cut the material out inside the marking lines. After cutting, smooth off the edges using a file.
|
|  | | M8903711 |
|
| | Remove the towbar by pressing in the lock knob and turning it down until a click is heard. Turn the lock knob down further, right to when it stops, hold the lock knob down and pull out the ball section.
|
|  | | M8903705 |
|
| | The illustration shows how the towbar and its components are assembled and installed on the body. |
|  | | M8901566 |
|
| | Install the screws (7, 8) from underneath the brackets (4:1, 5:1, 9:1), including the sleeves (6). Tighten by hand. The arrows on the brackets (4:1, 5:1, 9:1) must point in towards the centre of the car. Carry out on both sides, the right-hand side is illustrated.
|
|  | | M8901484 |
|
|  | | M8901646 |
|
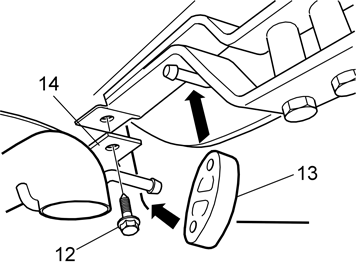
| | Illustration A Illustration B Carry out in accordance with illustration A and B Install the heat deflector plate (14) using the screw (12). Loosely screw the heat deflector plate into place on the member (2) using the screw (1). Bend the heat deflector plate using a screwdriver. Fully screw in the screw. Reinstall the rubber mounting (13) for the silencer. Use normal soap to facilitate installation.
|
|  | | M8901567 |
|
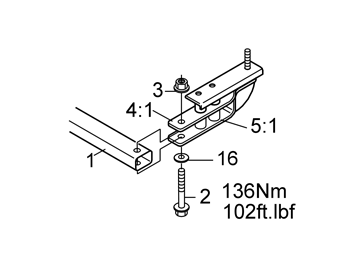
| | Insert the member (1) between the brackets (4, 5) and centre around the holes. Install the screws (2) and washers (16) from underneath the bracket (5) and the nuts (3) from above, without tightening.
|
|  | | M8901566 |
|
| | Tighten the screws (7) to 79 Nm (58 lbf.ft.). Tighten the screws (8) to 120 Nm (89 lbf.ft.). Carry out on both sides, the right-hand side is illustrated.
|
|  | | M8901567 |
|
| | Tighten the screws (2) and nut (3) to 136 Nm (100 lbf.ft.). Wait for at least five minutes so that the joint has time to set. Then tighten the screws (8) on both sides, a quarter turn (angle tightening 90°).
Note!
Torque tightened screws that have been removed must not be re-used. |
|
| | |
|  | | M8600867 |
|
| | Applies to cars up to and including model year –2004 (CH -458999) Applies if the car has moulding: Reinstall the mouldings (3) on the expander screws and press them in. If the guide lugs (4) and clips (5) have loosened – reinstall them. Applies to cars with parking assistance: Lift up the bumper in position. Pull the cable for the sensors through the hole for the bumper's guide, and pull the cable in from the inside. Reinstall the bumper by pressing it forwards. Ensure that the four screws, protruding from the bumper, align with the holes in the car. Before the bumper is completely installed, slide the top edge (1) into the grooves. Then slide the bumper fully in. Check that the guide lug (4) and clip (5) are centred with the hole (2) in the wheel arch liner.
|
|  | | M8600569 |
|
| | Applies to cars up to and including model year –2004 (CH -458999) Tighten the screw (1) on both sides. Rivet (2) the bumper into place as illustrated. Reinstall the nuts. Tighten the nuts. Tighten to 18 Nm (13 lbf.ft.). Connect the antenna connector.
Applies to cars with rear mudflaps Rivet in the mudflap. Reinstall the wheels and tighten the screws alternately to 110 Nm (81 lbf.ft.).
|
|  | | IMG-230001 |
|
| | Applies to cars from and including model year 2005- (CH459000-) Applies to cars with parking assistance: Lift up the bumper in position. Pull the cable for the sensors through the hole for the bumper's guide, and pull the cable in from the inside. Guide the hooks (1) for the bumper into the guides (2) in the side brackets. Press at the upper edge and in the middle so that the hooks engage.
|
|  | | IMG-230002 |
|
| | Applies to cars from and including model year 2005- (CH459000-) Install the screw (1) in the upper edge of the end face on both sides. Install the screw (2) in the lower edge of the wheel arch on both sides. Install the four clips.
Applies to cars with rear mudflaps Rivet in the mudflap. Reinstall the wheels and tighten the screws alternately to 110 Nm (81 lbf.ft.).
|
|  | | M8101296 |
|
| | Install the rubber tabs from the kit over the four installed screws as follows: Align the rubber tabs (1) edge to edge with the lining mat. Compress the rubber tab (2) slightly to align in the cut-out. Align the rubber tab (3) so that the lower edge is positioned edge to edge with the lining mat. Then cut off the section protruding from the lining mat. Do not remove too much.
|
|  | | IMG-213440 |
|
| | |
|  | | M8903707 |
|
| | |
|  | | IMG-222587 |
|
| | Remove the towbar and place it in the protective bag. Place the towbar in the spare tyre as illustrated. Thread the strap through the two nearest holes in the wheel and route the strap around the towbar. Insert the strap into the tensioner. Tighten the strap until the towbar is secured and stable.
|
|  | | J8903520 |
|
| | |
|  | | IMG-213442 |
|
| | |
| | |
|  | | A8800137 |
|
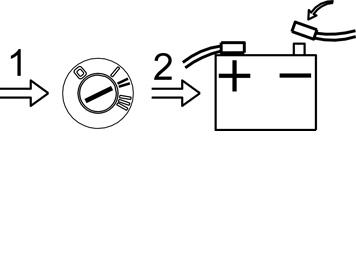
| | Reinstall: The battery negative lead The battery cover and holder The side panel The storage cover and the floor hatch.
|
| | |


